Sonatype Nexus, With a Slice of Pi
Note: These instructions are superseded with my CLI that I wrote to ease the configuration. I am retaining these instructions so that the curious among you can see the details behind what the Lab CLI abstracts.
Installing Nexus on a Raspberry Pi 4B
-
Log onto the Pi:
ssh root@bastion.${LAB_DOMAIN} -
Install Java runtime
OpenWrt does not include a packaged Java runtime. So, we are going to borrow one from Alpine Linux.
-
Grab the packages and unpack them:
mkdir /tmp/work-dir cd /tmp/work-dir PKG="openjdk8-8 openjdk8-jre-8 openjdk8-jre-lib-8 openjdk8-jre-base-8 java-cacerts" for package in ${PKG}; do FILE=$(lftp -e "cls -1 alpine/edge/community/aarch64/${package}*; quit" http://dl-cdn.alpinelinux.org) curl -LO http://dl-cdn.alpinelinux.org/${FILE} done for i in $(ls) do tar xzf ${i} done -
Move the package files to the proper install locations:
mv ./usr/lib/jvm/java-1.8-openjdk /usr/local/java-1.8-openjdk -
Add Java to the
PATHexport PATH=${PATH}:/root/bin:/usr/local/java-1.8-openjdk/bin echo "export PATH=\$PATH:/root/bin:/usr/local/java-1.8-openjdk/bin" >> /root/.profile -
The installed
cacertsfile is empty, so we need to import the certs from the OS.opkg update opkg install ca-certificates rm -f /usr/local/java-1.8-openjdk/jre/lib/security/cacerts keytool -noprompt -importcert -file /etc/ssl/certs/ca-certificates.crt -keystore /usr/local/java-1.8-openjdk/jre/lib/security/cacerts -keypass changeit -storepass changeit for i in $(find /etc/ssl/certs -type f) do ALIAS=$(echo ${i} | cut -d"/" -f5) keytool -noprompt -importcert -file ${i} -alias ${ALIAS} -keystore /usr/local/java-1.8-openjdk/jre/lib/security/cacerts -keypass changeit -storepass changeit done -
Finally, clean up:
cd
rm -rf /tmp/work-dir
-
-
Install Sonatype Nexus OSS
mkdir -p /usr/local/nexus/home cd /usr/local/nexus wget https://download.sonatype.com/nexus/3/latest-unix.tar.gz -O latest-unix.tar.gz tar -xzf latest-unix.tar.gz NEXUS=$(ls -d nexus-*) ln -s ${NEXUS} nexus-3 rm -f latest-unix.tar.gz -
Add a user for Nexus:
groupadd nexus useradd -g nexus -d /usr/local/nexus/home nexus chown -R nexus:nexus /usr/local/nexus -
Create a service script for Nexus so the OS can start and stop it:
sed -i "s|#run_as_user=\"\"|run_as_user=\"nexus\"|g" /usr/local/nexus/nexus-3/bin/nexus.rc cat <<EOF > /etc/init.d/nexus #!/bin/sh /etc/rc.common START=99 STOP=80 SERVICE_USE_PID=0 start() { ulimit -Hn 65536 ulimit -Sn 65536 service_start /usr/local/nexus/nexus-3/bin/nexus start } stop() { service_stop /usr/local/nexus/nexus-3/bin/nexus stop } EOF chmod 755 /etc/init.d/nexus -
Configure Nexus to use the JRE that we installed
sed -i "s|# INSTALL4J_JAVA_HOME_OVERRIDE=|INSTALL4J_JAVA_HOME_OVERRIDE=/usr/local/java-1.8-openjdk|g" /usr/local/nexus/nexus-3/bin/nexus -
Before we start Nexus, let’s go ahead a set up TLS so that our connections are secure from prying eyes.
keytool -genkeypair -keystore /usr/local/nexus/nexus-3/etc/ssl/keystore.jks -deststoretype pkcs12 -storepass password -keypass password -alias jetty -keyalg RSA -keysize 4096 -validity 5000 -dname "CN=nexus.${DOMAIN}, OU=okd4-lab, O=okd4-lab, L=Roanoke, ST=Virginia, C=US" -ext "SAN=DNS:nexus.${DOMAIN},IP:${BASTION_HOST}" -ext "BC=ca:true" keytool -importkeystore -srckeystore /usr/local/nexus/nexus-3/etc/ssl/keystore.jks -destkeystore /usr/local/nexus/nexus-3/etc/ssl/keystore.jks -deststoretype pkcs12 -srcstorepass password rm -f /usr/local/nexus/nexus-3/etc/ssl/keystore.jks.old chown nexus:nexus /usr/local/nexus/nexus-3/etc/ssl/keystore.jks -
Modify the Nexus configuration for HTTPS:
mkdir /usr/local/nexus/sonatype-work/nexus3/etc cat <<EOF >> /usr/local/nexus/sonatype-work/nexus3/etc/nexus.properties nexus-args=\${jetty.etc}/jetty.xml,\${jetty.etc}/jetty-https.xml,\${jetty.etc}/jetty-requestlog.xml application-port-ssl=8443 EOF chown -R nexus:nexus /usr/local/nexus/sonatype-work/nexus3/etc -
Now we should be able to start Nexus:
/etc/init.d/nexus enable /etc/init.d/nexus start -
Nexus will take a while to start for the first time.
Go make a nice cup of tea, coffee, or hot beverage of your choice. Nexus will be up shortly.
-
After Nexus has started, trust the new Nexus cert on your workstation:
-
Mac OS:
openssl s_client -showcerts -connect nexus.${LAB_DOMAIN}:8443 </dev/null 2>/dev/null|openssl x509 -outform PEM > /tmp/nexus.${LAB_DOMAIN}.crt sudo security add-trusted-cert -d -r trustRoot -k "/Library/Keychains/System.keychain" /tmp/nexus.${LAB_DOMAIN}.crt -
Linux:
openssl s_client -showcerts -connect nexus.${LAB_DOMAIN}:5001 </dev/null 2>/dev/null > /tmp/nexus.${LAB_DOMAIN}.cert
sudo openssl x509 -outform PEM -in /tmp/nexus.${LAB_DOMAIN}.cert -out /etc/pki/ca-trust/source/anchors/nexus.${LAB_DOMAIN}.crt
rm /tmp/nexus.${LAB_DOMAIN}.cert
sudo update-ca-trust
-
Set up Nexus for image mirroring:
Now point your browser to https://nexus.${LAB_DOMAIN}:8443. Login, and create a password for your admin user.
If prompted to allow anonymous access, select to allow.
The ? in the top right hand corner of the Nexus screen will take you to their documentation.
-
We need to create a hosted Docker registry to hold the mirror of the OKD images that we will use to install our cluster.
-
Login as your new admin user
-
Select the gear icon from the top bar, in between a cube icon and the search dialog.
-
Select
Repositoriesfrom the left menu bar.
-
Select
+ Create repository -
Select
docker (hosted)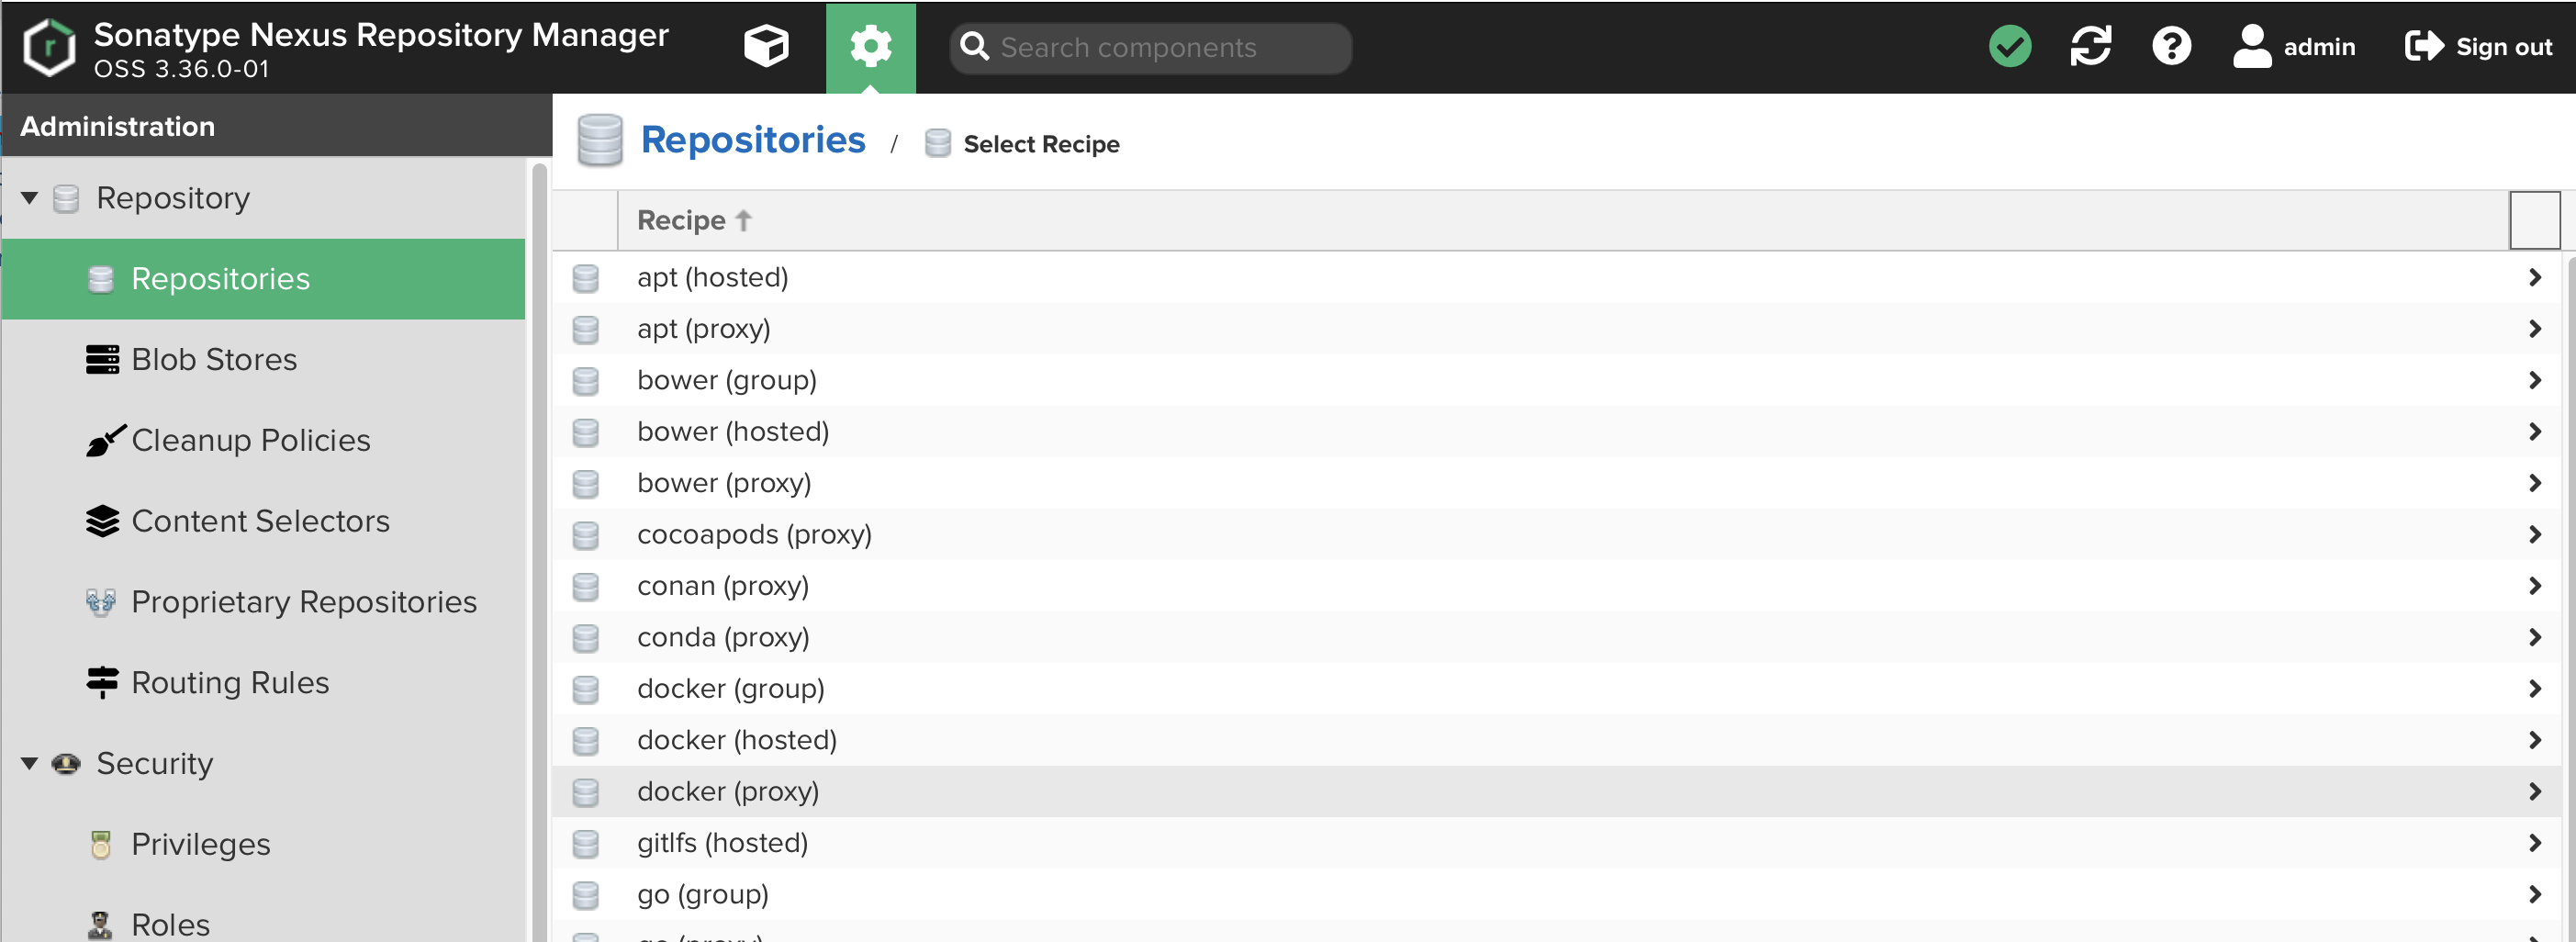
-
Name your repository
okd -
Check
HTTPSand put5001in the port dialog entry -
Check
Allow anonymous docker pull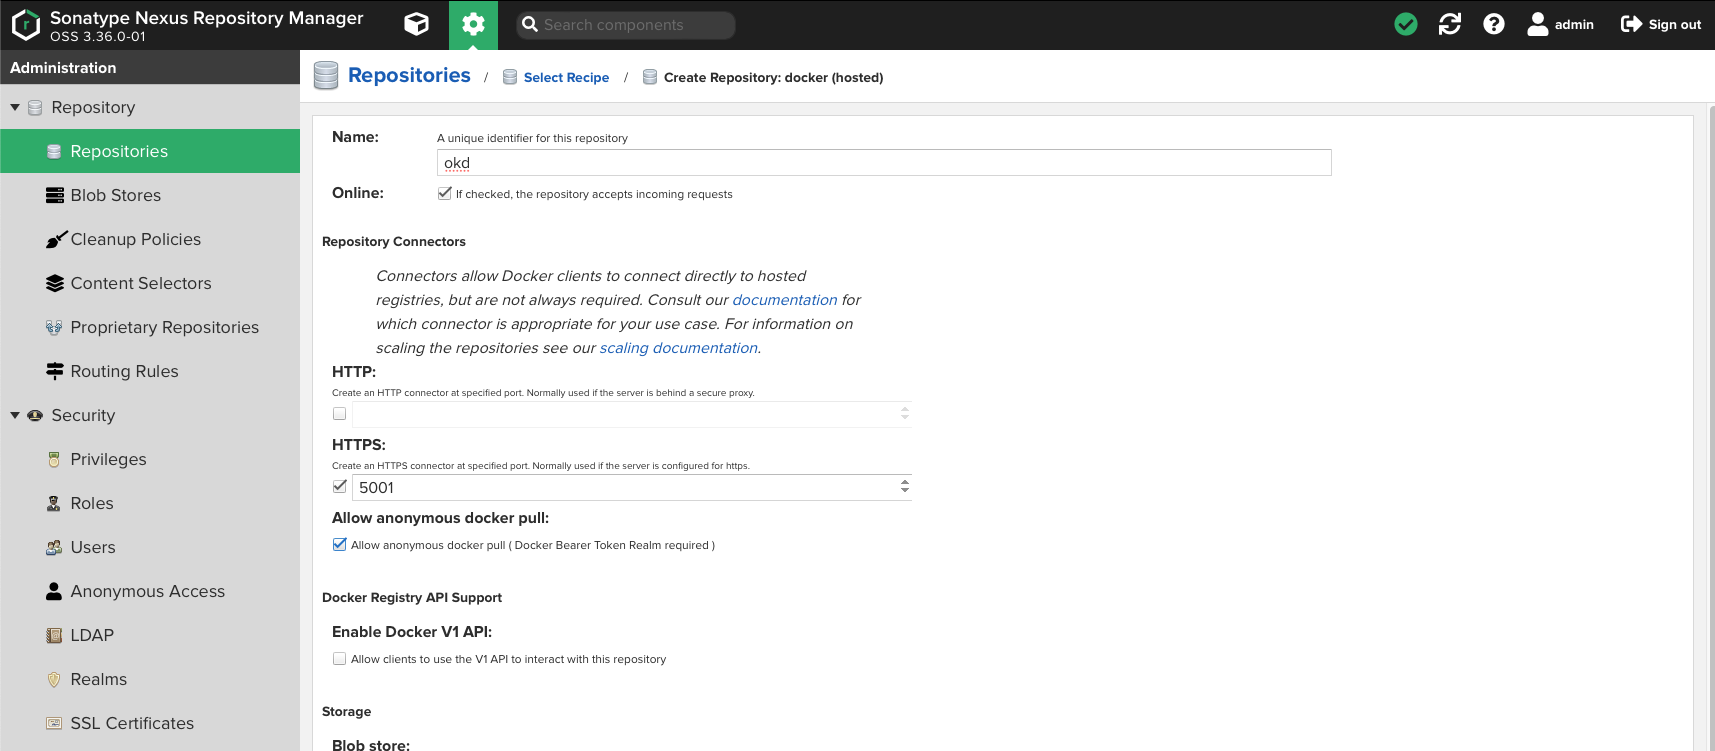
-
Click
Create repositoryat the bottom of the page.
-
-
Next we need to create a Proxy registry for
gcr.io. We’ll need this later on for Tekton.-
Select
Repositoriesfrom the left menu bar. -
Select
+ Create repository -
Select
docker (proxy) -
Name your repository
gcr-io -
Check
Allow anonymous docker pull -
Set
https://gcr.ioas theRemote storagelocation.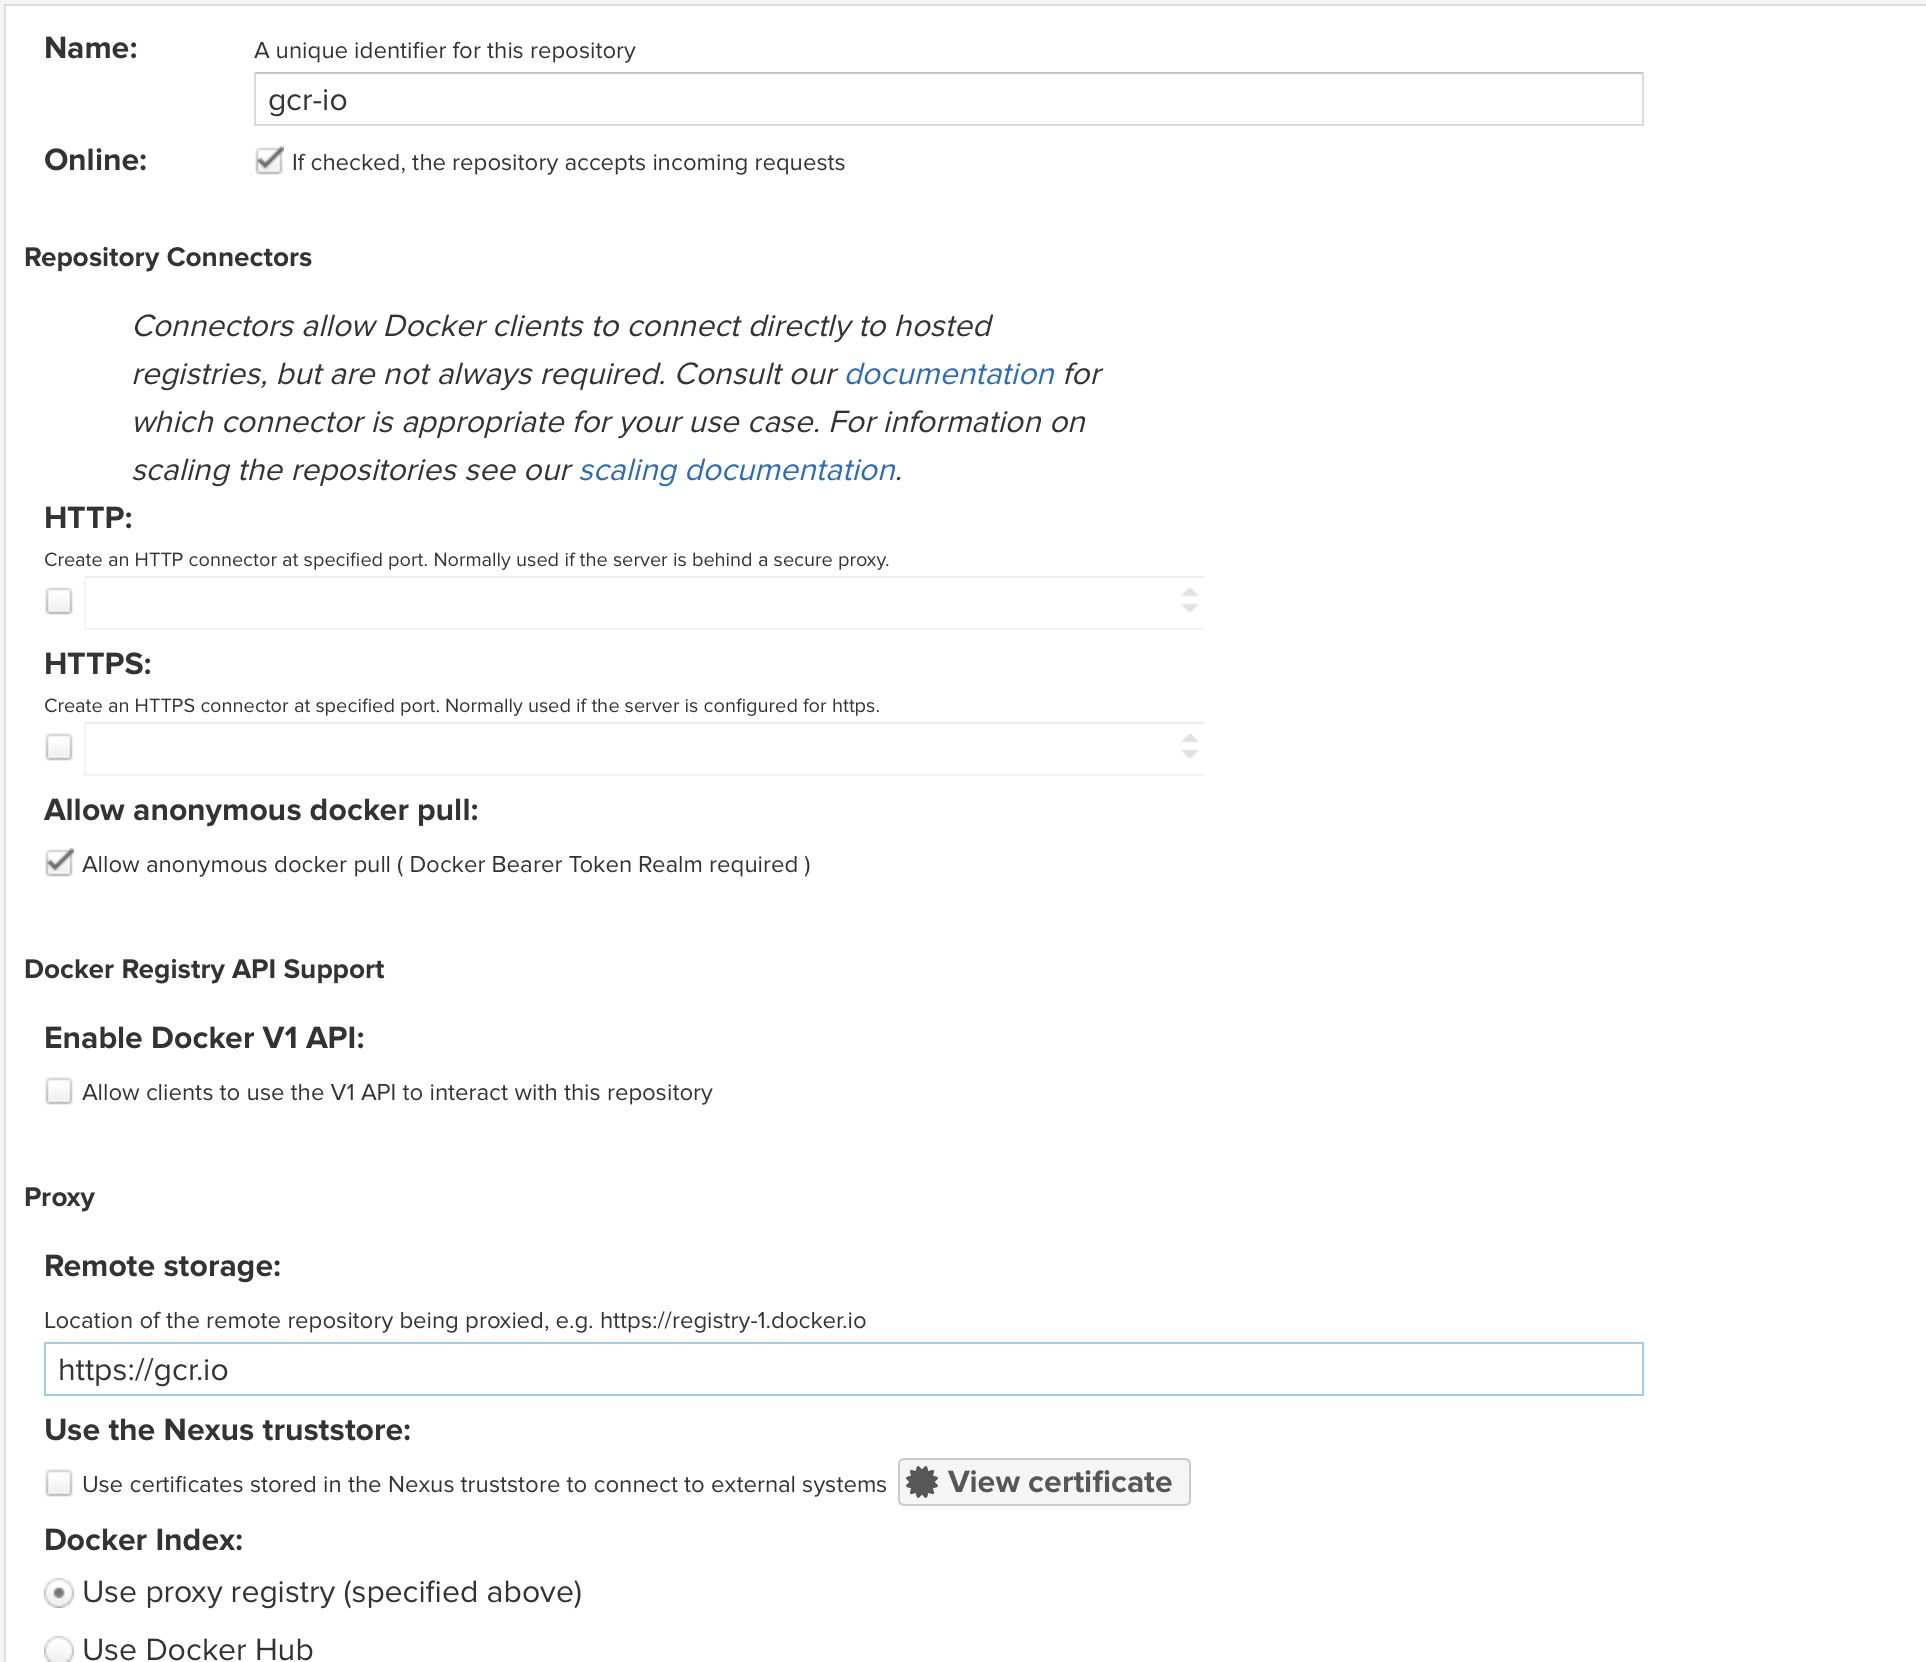
-
Click
Create repositoryat the bottom of the page.
-
-
Finally, create a Group registry as an umbrella for the hosted and proxy registries.
-
Select
Repositoriesfrom the left menu bar. -
Select
+ Create repository -
Select
docker (group) -
Name your repository
lab-registry -
Check
HTTPSand put5000in the port dialog entry -
Check
Allow anonymous docker pull -
Set
https://gcr.ioas theRemote storagelocation.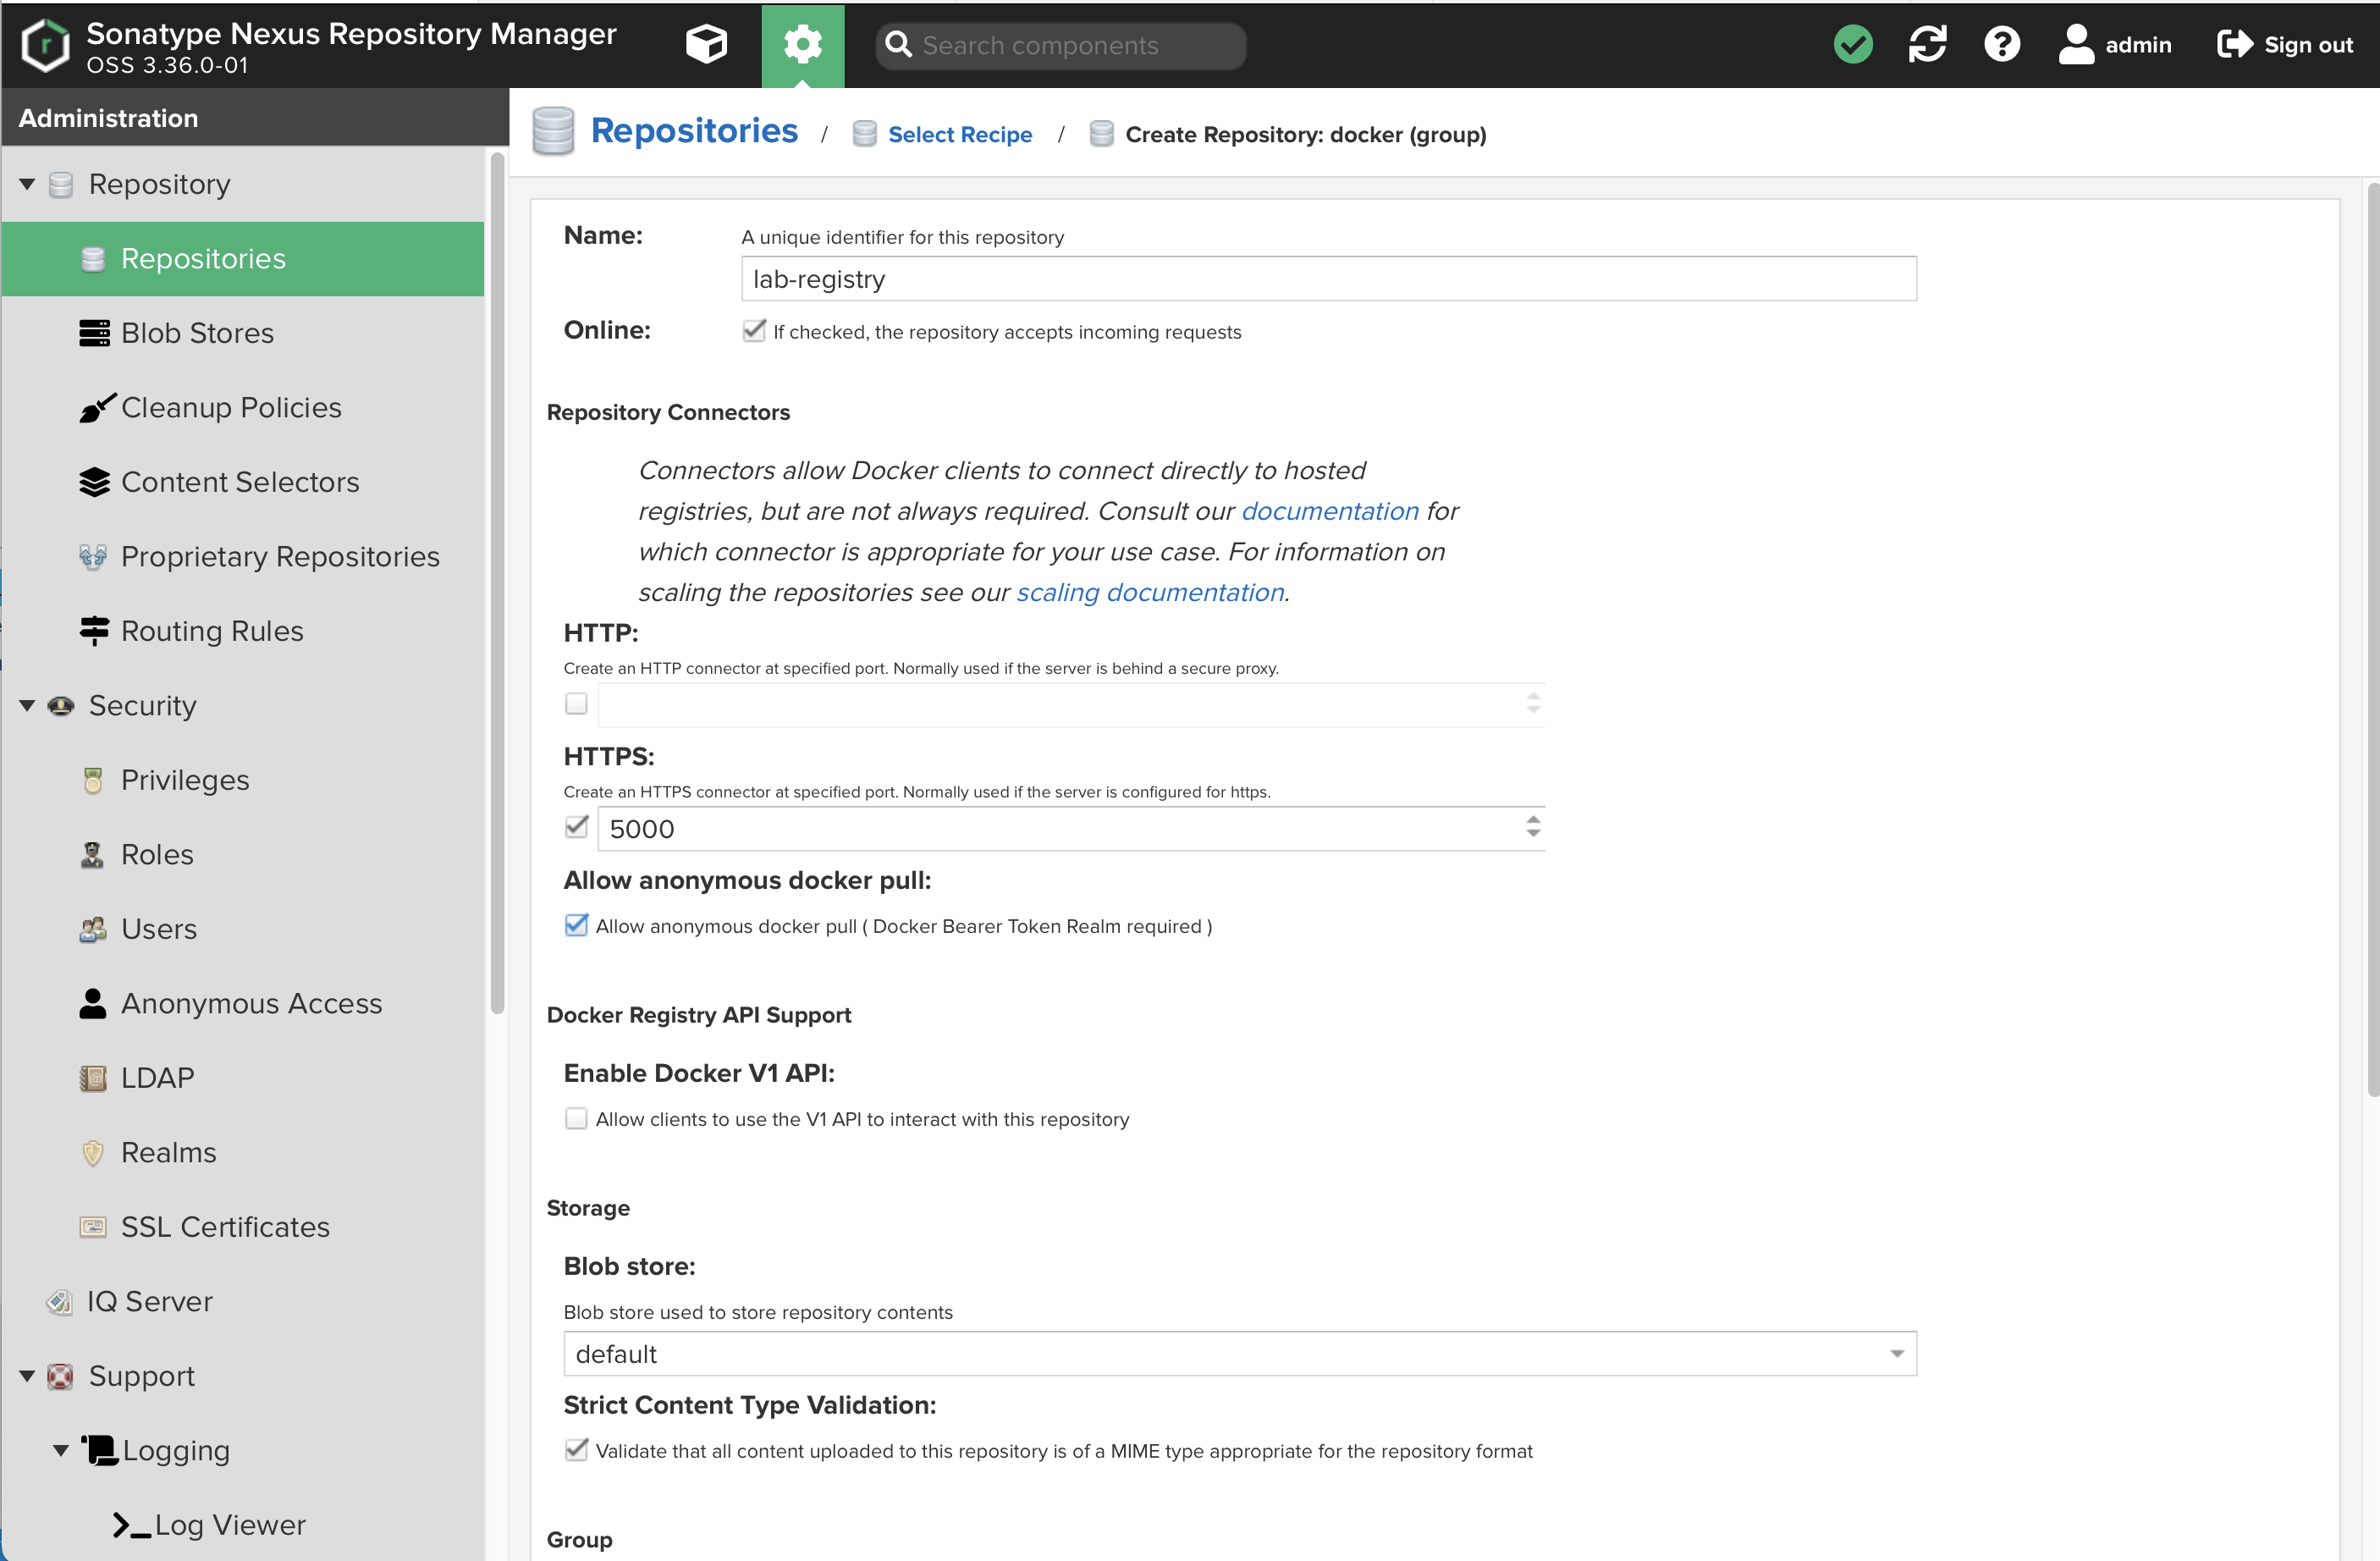
-
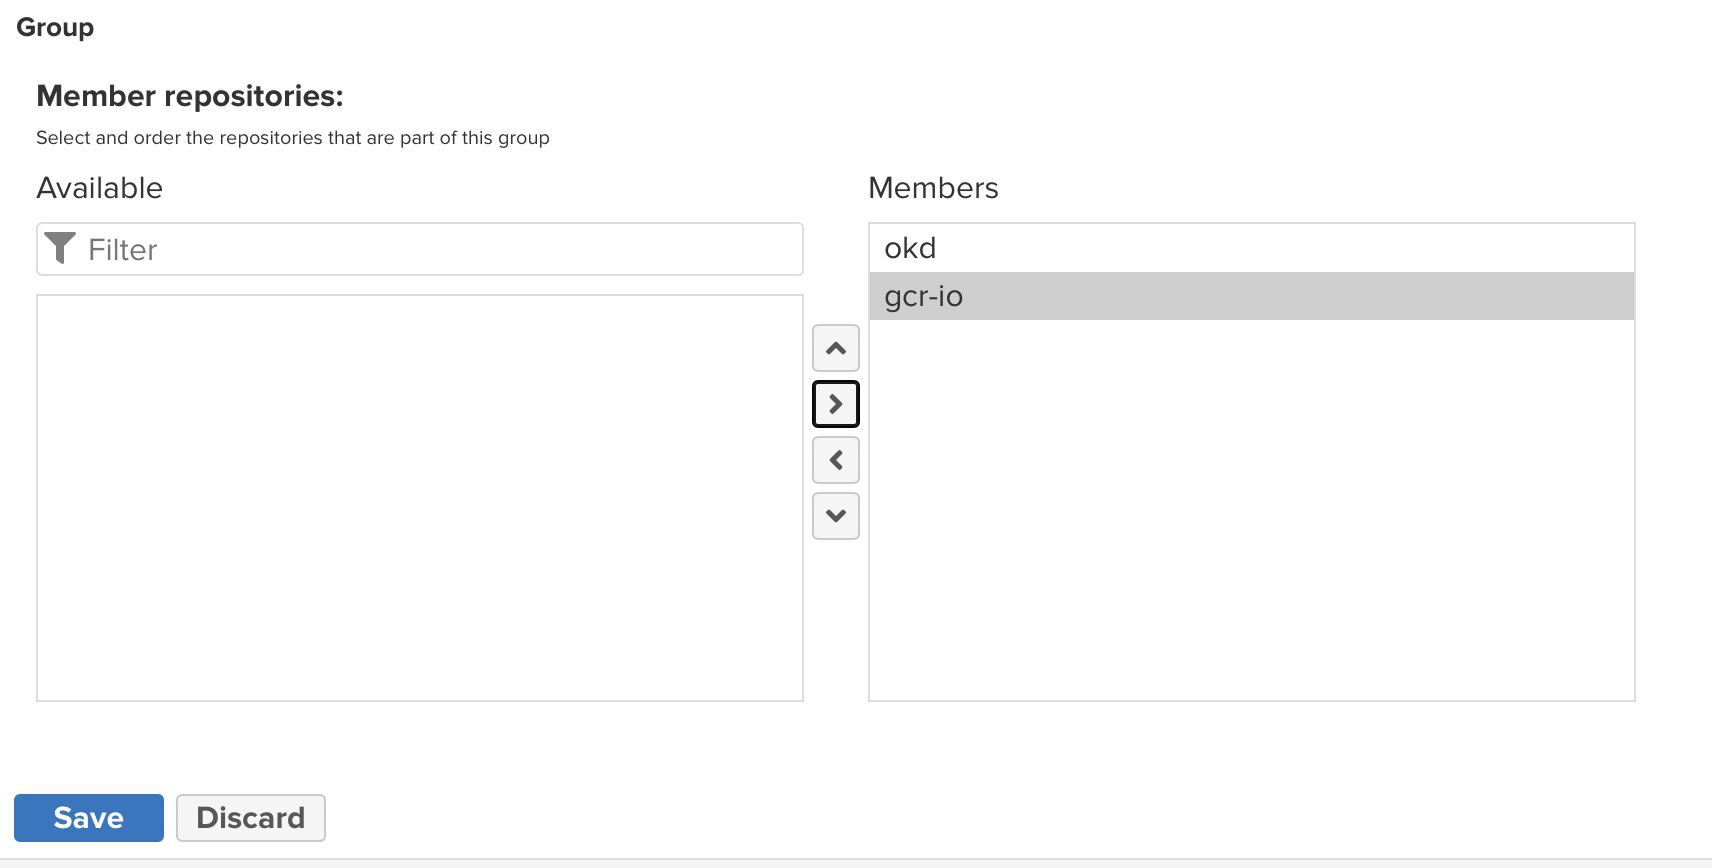
Add your other two registries as group members:
-
Click
Create repositoryat the bottom of the page.
-
-
Now expand the
Securitymenu on the left and selectRealms-
Add
Docker Bearer Token Realmto the list of activeRealms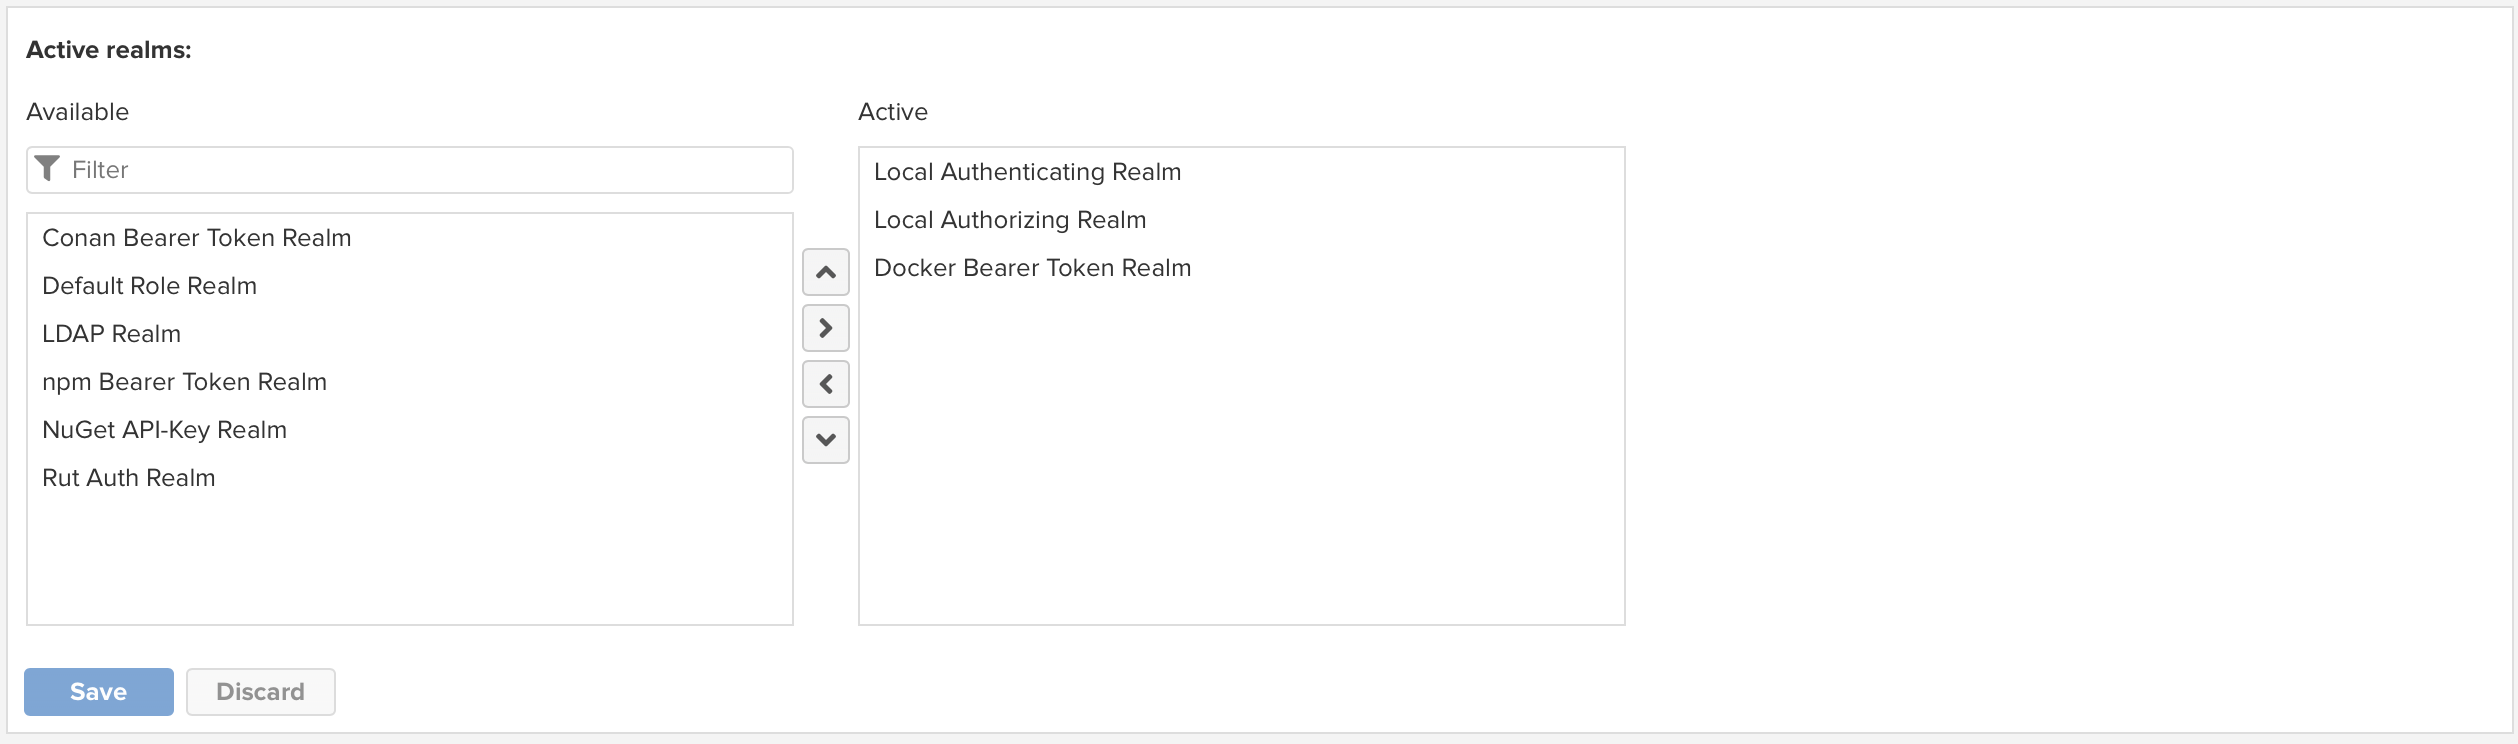
-
Click
Save
-
-
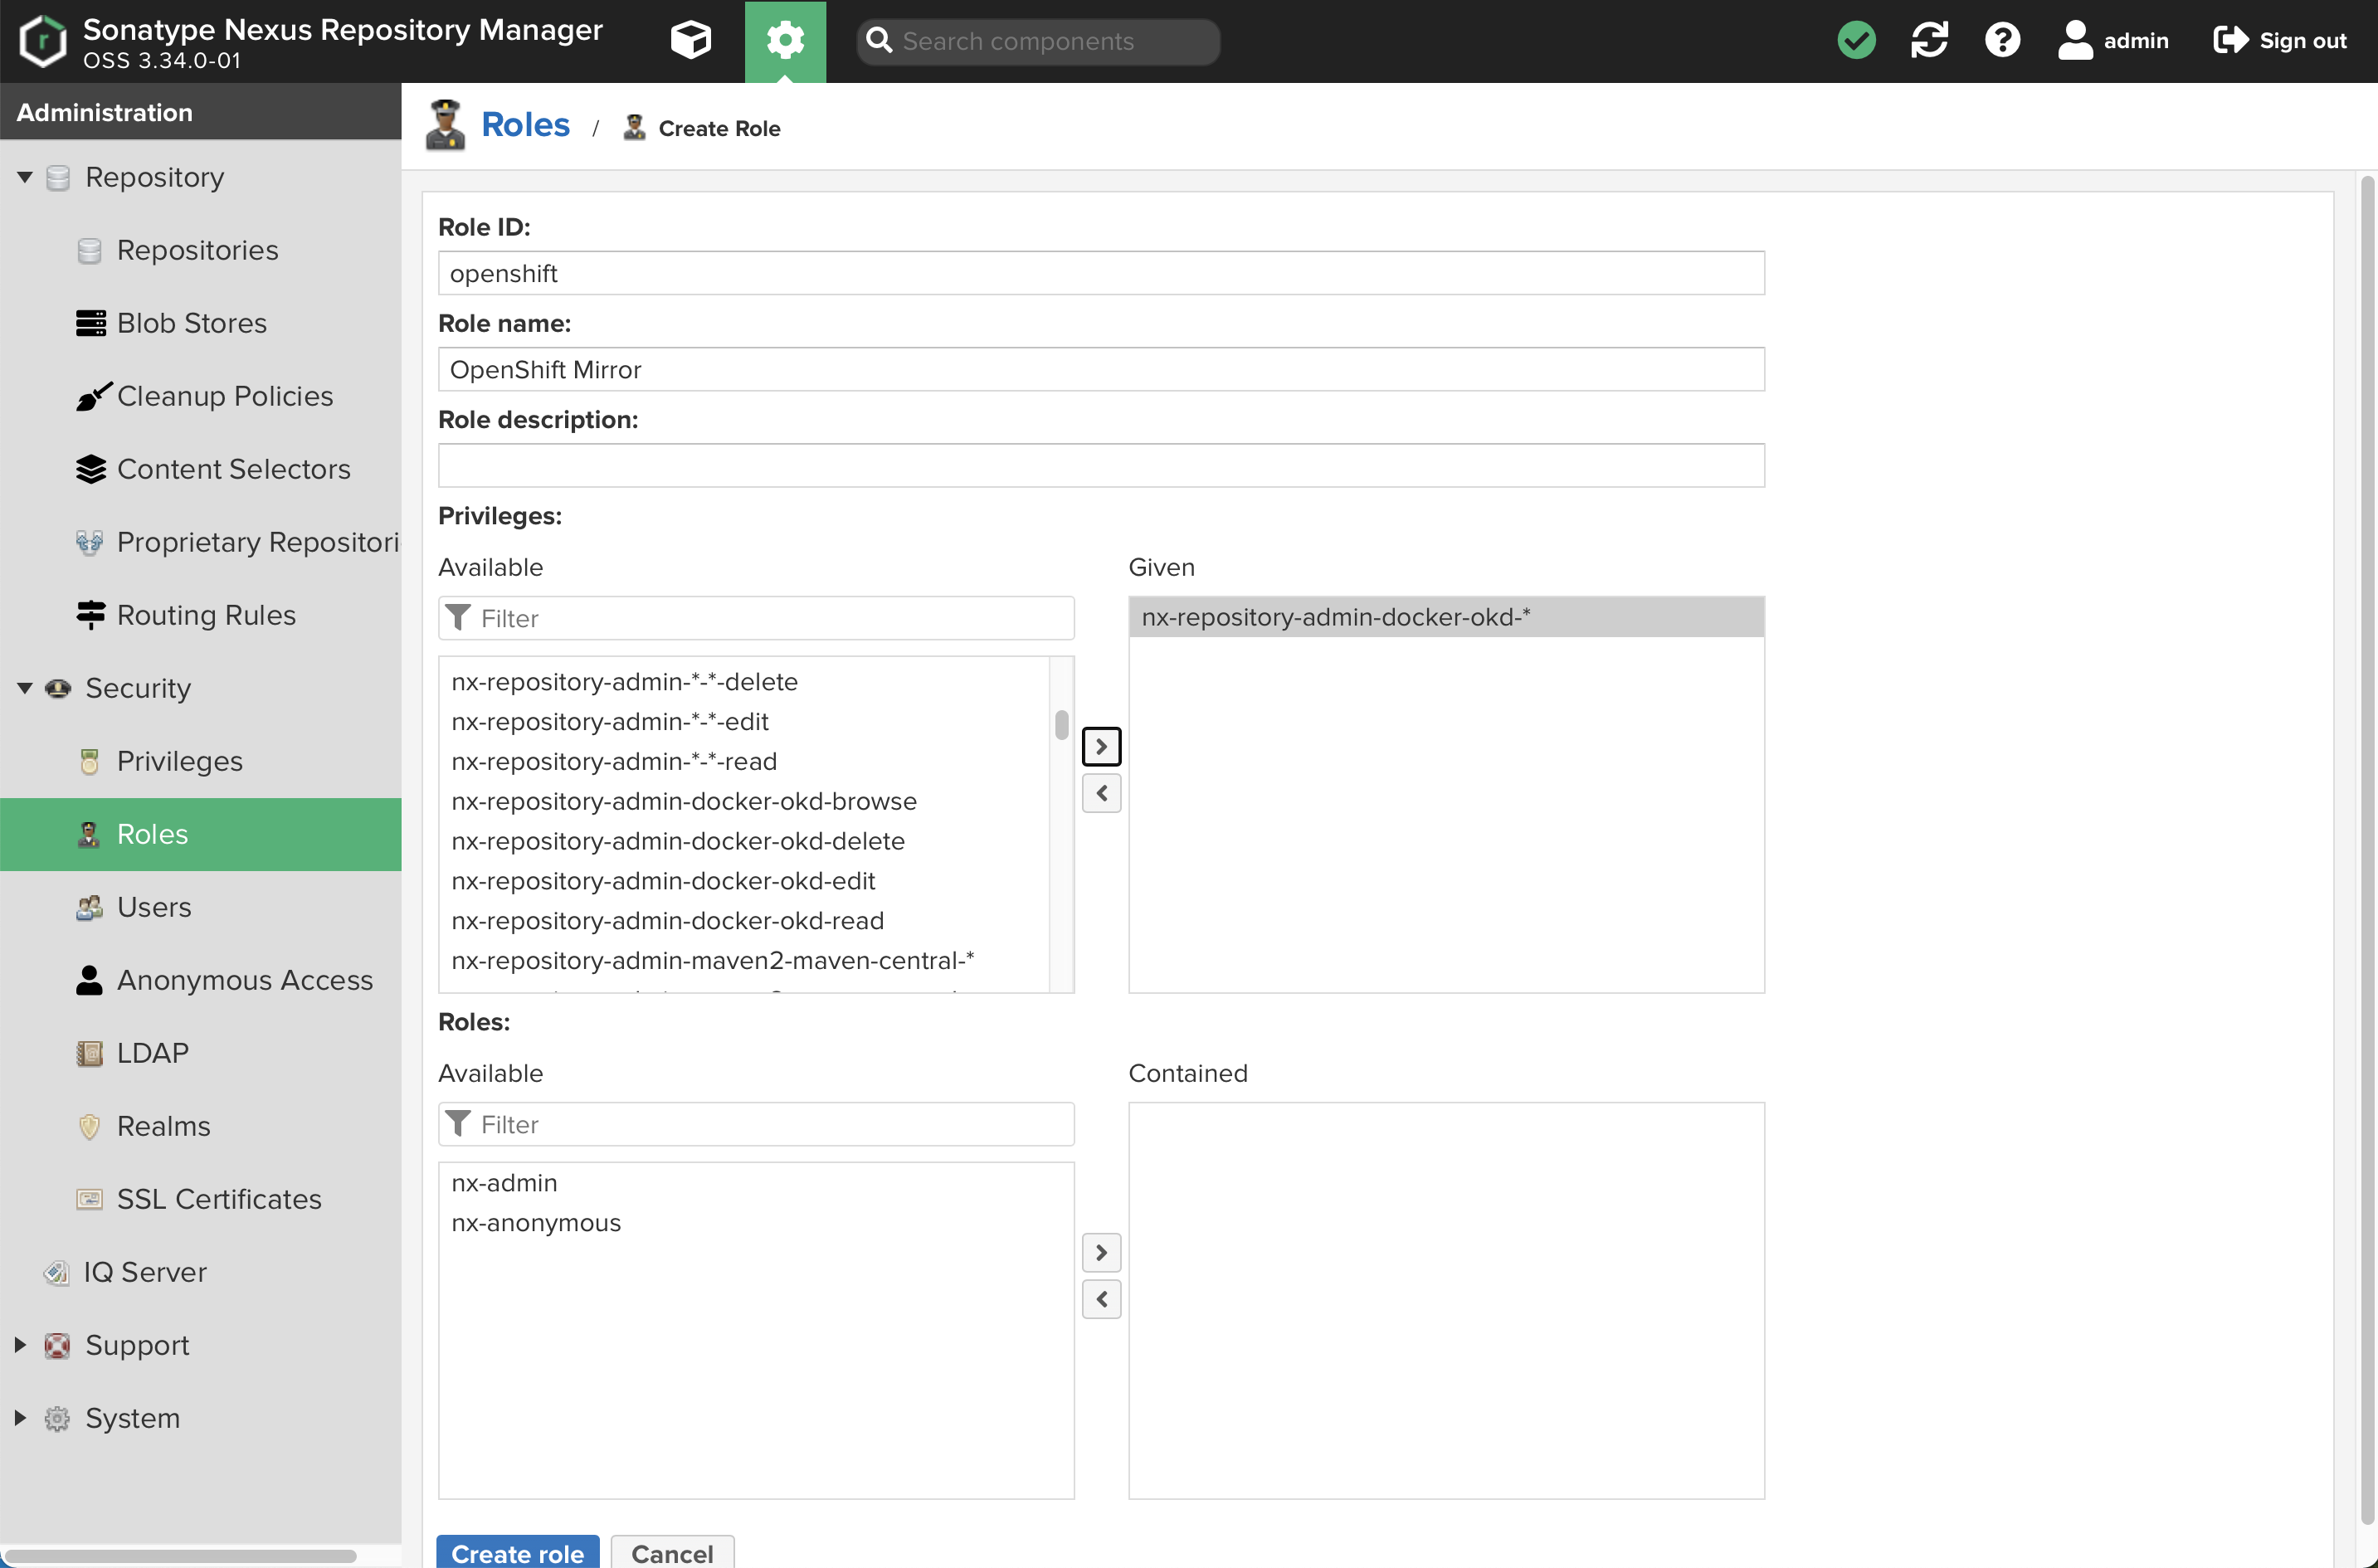
Now, select
Rolesfrom the expandedSecuritymenu on the left.-
Click
+ Create roleand selectNexus role -
Create the role as shown:
-
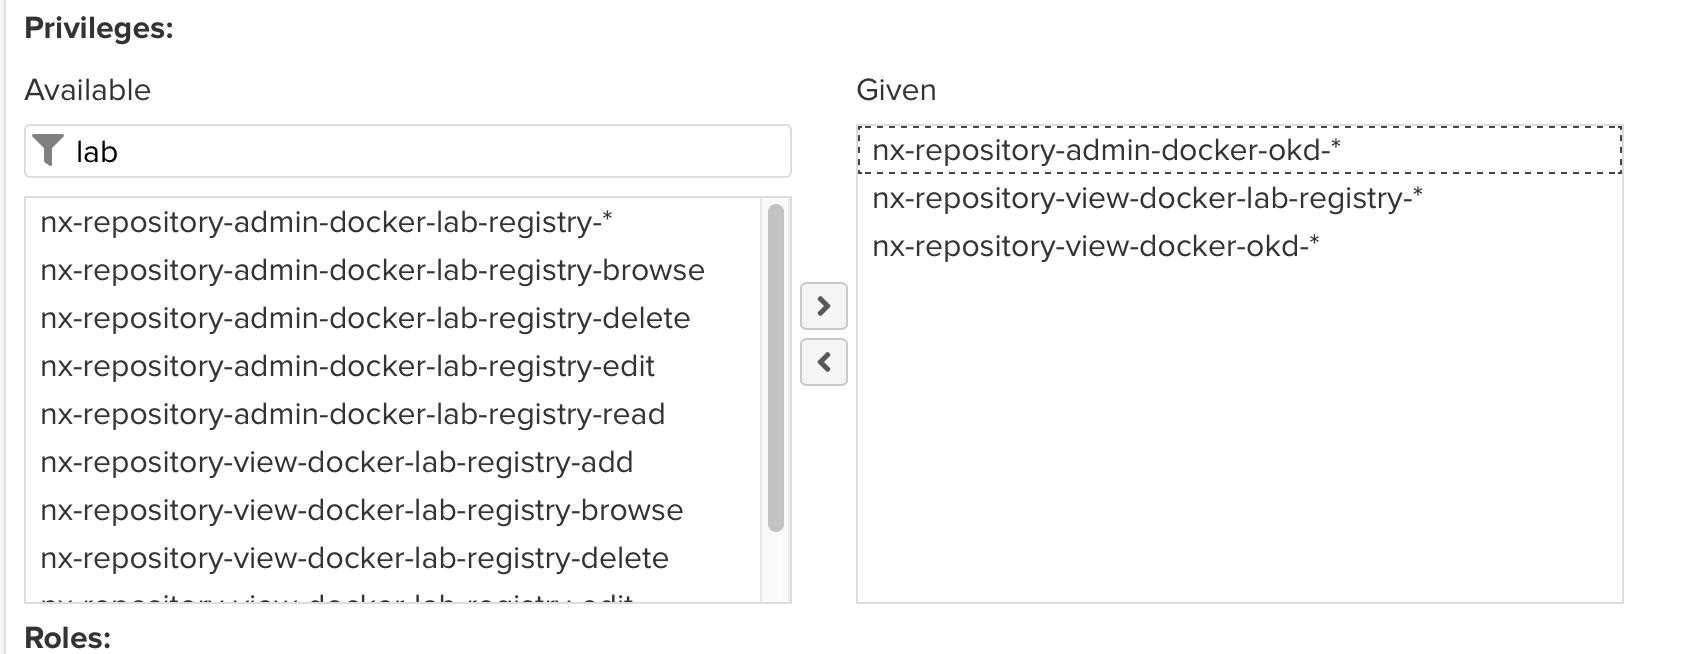
Add the appropriate privileges as shown:
-
Click
Create role
-
-
Now, select
Usersfrom the expandedSecuritymenu on the left.
-
Click
Create local user -
Create the user as shown:
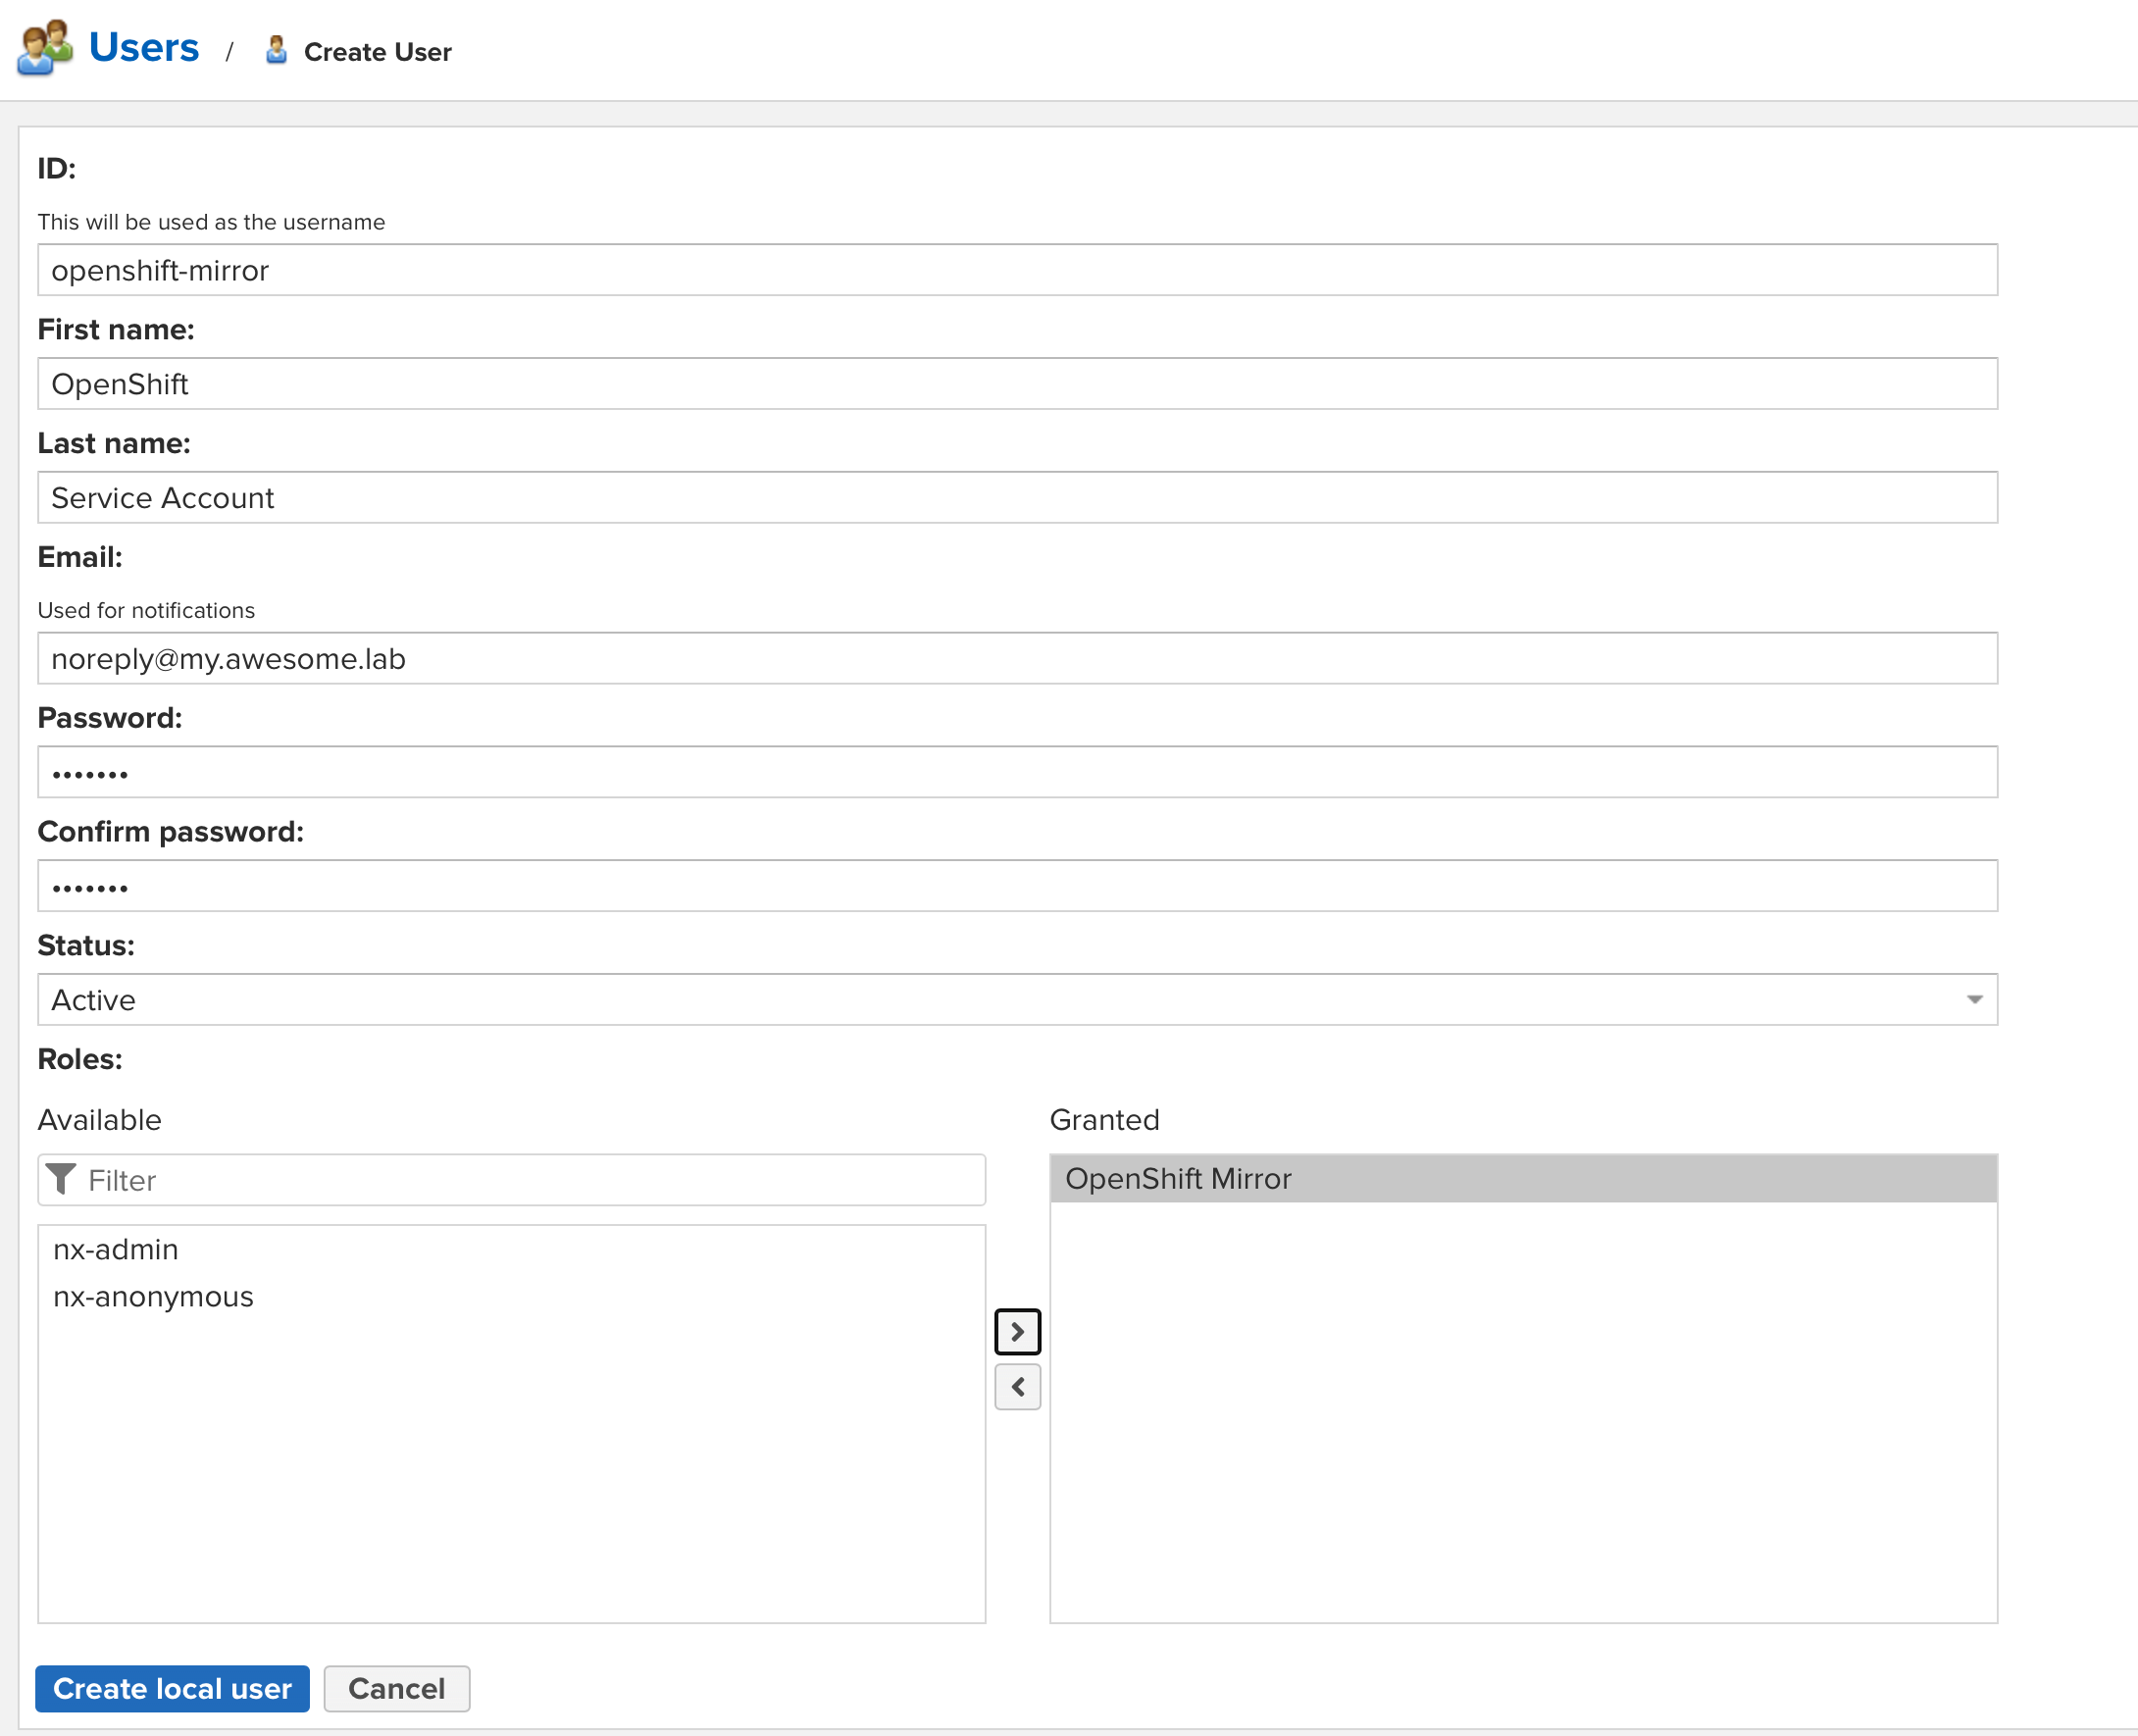
-