Building a Portable Kubernetes Home Lab with OpenShift - OKD4
Note: I have started a refactor of this site based on some recent changes that I made to my labcli project, and the fact that the travel routers that I use have all been discontinued now. Look for changes in the near future. For now, you can get an updated tutorial here: https://upstreamwithoutapaddle.com/blog%20post/2023/03/06/Back-To-Where-It-All-Started.html. This will guide you through deploying a Single Node OpenShift cluster.
There are a lot of really good Kubernetes and OpenShift tutorials out there. This one strives to be a little bit different in that it is going to simulate the network configuration found in a real data center environment. This tutorial is targeted toward architects and engineers who are interested in both infrastructure and application development. This is not Code Ready Containers, or MiniKube. Both of those are excellent developer tools and can be used to learn Kubernetes basics. No, what you will build from the following tutorial will be a production like OpenShift cluster. Your new lab will be very expandable as well. Add more KVM hosts, and you can build more sophisticated OpenShift environments.
I have broken this tutorial up into multiple pages to help reduce the TL;DR that can result from really long pages. Each section will guide you through the setup of a lab capability. After the OpenShift cluster is up and running, future blog posts will show you how to add some capabilities to it, and get it setup to support application delivery.
We will start by setting up a layered network architecture that will enable us to isolate our OpenShift cluster from the internet. We’ll use firewall rules to allow the access that we want to grant. With this setup, you will also be able to add additional, isolated clusters to your lab as you expand your capabilities. The additional clusters can be used to simulate Dev -> QA -> Prod CI/CD, or multi-datacenter configurations.
By following this tutorial, you will set up the following capabilities for your OpenShift home lab:
- OpenWRT Router #1 (GL.iNet GL-MV1000W or GL-MV1000 Travel Router)
- Edge internet access
- Edge DNS services
- Edge Firewall
- Wireless access to your lab
- OpenWRT Router #2 (GL.iNet GL-MV1000 Travel Router)
- PXE Boot for bare metal hosts and for OpenShift nodes
- Internal Lab DNS Server
- Internal Firewall
- HA-Proxy Network Load Balancer for the OpenShift cluster
- OpenWRT Bastion Server (Raspberry Pi 4b 8GB)
- CentOS Stream repository mirror
- Sonatype Nexus for Container Image Registry, Maven & NPM Proxy/Mirror
- Gitea SCM server
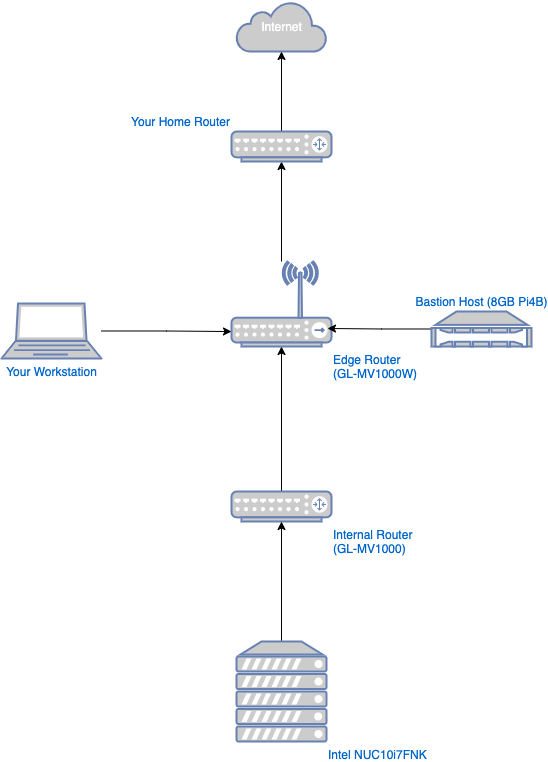
The network topology will look like this illustration:
Select your Lab Gear
Your Lab can start small, and grow as your needs dictate:
Of course… small is relative. So, at this point you need to make a choice; virtualized infrastructure or bare-metal, full cluster or single node.
Take a look at the links below, acquire the gear that you need, and carry on.
-
Start Here:
-
Set up Your Workstation:
-
Configure Your Network Gear:
-
Install OpenShift