Back To Where It All Started - Let’s Build an OpenShift Home Lab
Happy 2023! I hope that your year is starting out on a positive trajectory. Yes, I realize that it’s already March… but, Happy New Year regardless.
I started this blog on August 1, 2021 with a post about building a Kubernetes home lab with the community supported distribution of OKD which shares its codebase with Red Hat OpenShift.
From the limited usage data that I am able to get from Google about my Blog, it appears that the most popular section of this site is the post about building a single node OpenShift cluster. So… In this post, I am going to revisit the original purpose of this blog by showing you how to build a simplified version of my OpenShift home lab. In this post you will build a single node OpenShift cluster (SNO).
This lab is intended to be very flexible so that you can reconfigure it at will. It will also grow as you are able to add additional hardware.
There are three motivations driving this re-write of the home lab project:
-
The GL.iNet edge routers that I originally built the network around have been discontinued.
So, it’s time for an upgrade.
-
A disconnected network setup with multiple routers and firewalls adds complexity to the lab that might put it beyond the reach of someone just getting started.
I am refactoring the lab documentation to allow you to start with the simplest possible setup. One router, and one Intel server.
-
Startup cost for my original setup is higher because of the need for two routers and a Raspberry Pi.
By eliminating the disconnected install, you save around $250 in the initial startup cost.
So, here is a home lab that you can build with one Intel server and a travel router.
Required Equipment
-
Router - These instructions are specifically crafted for the GL-iNet GL-AXT1800 travel router. Although, if you hack the scripts you should be able to use any OpenWRT based router that has enough CPU and RAM.
-
SD Flash Drive - You will need at least 64GB on a microSDXC flash drive:
I’m using this one, which is pretty affordable, but also fast: 128 GB SD Card
-
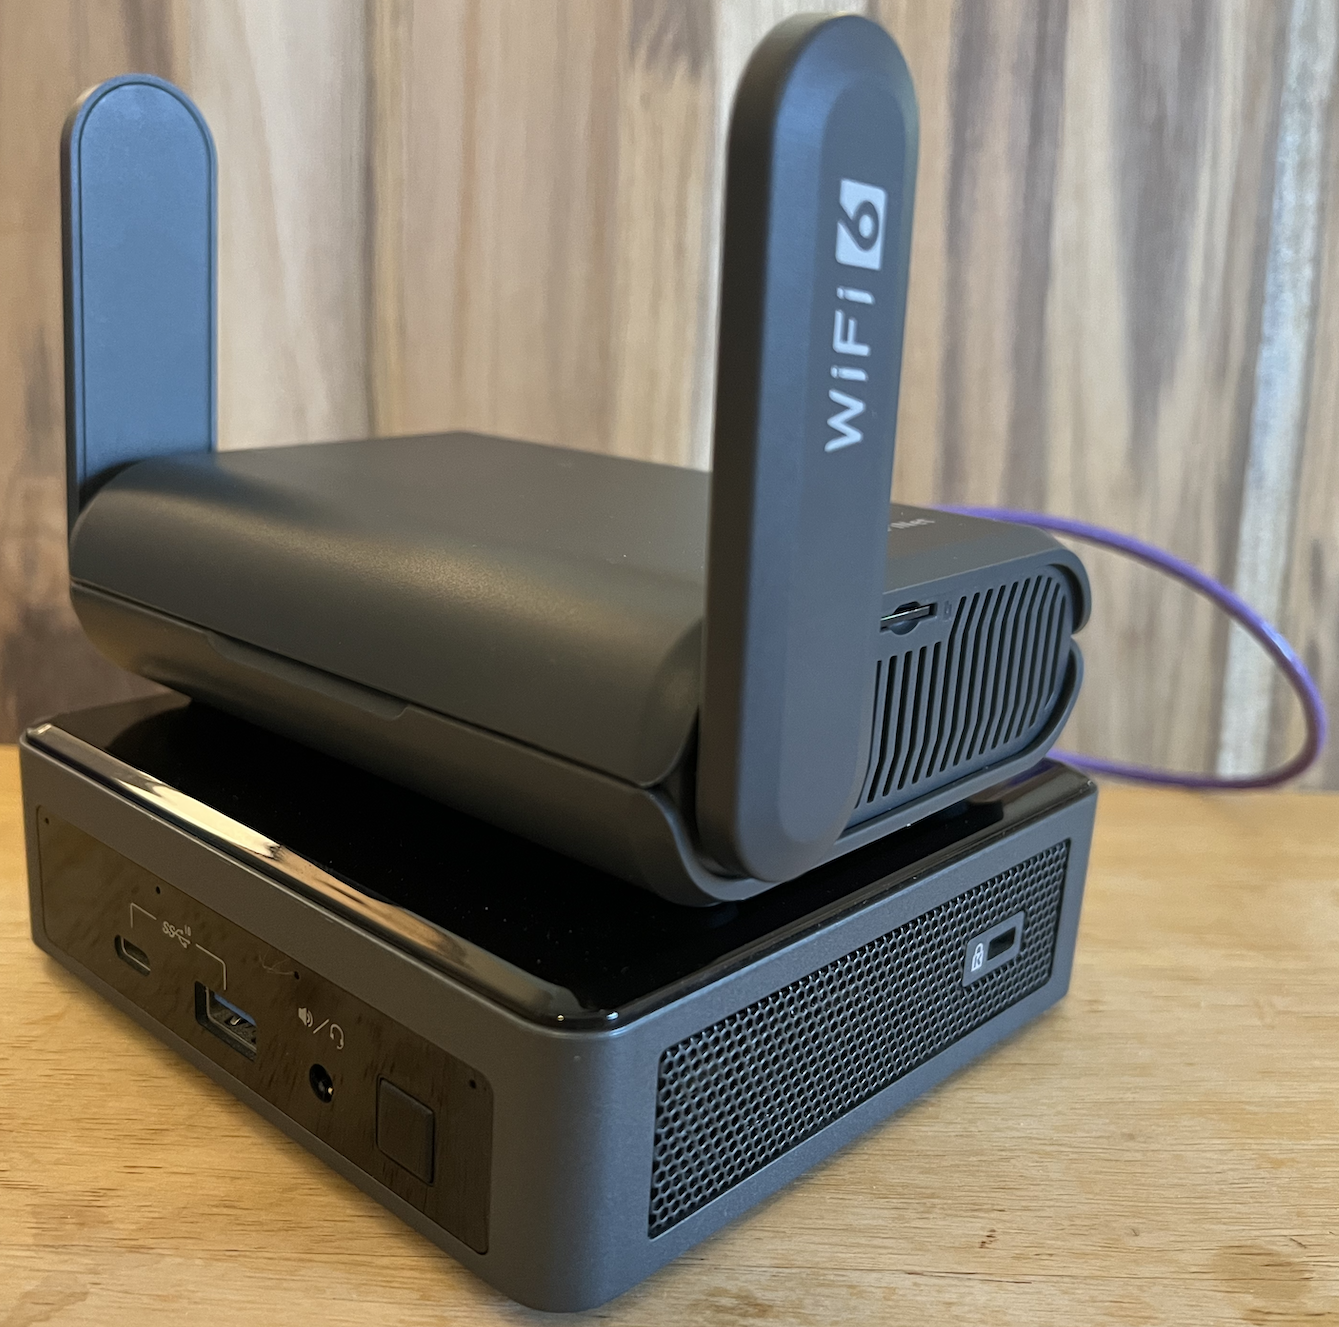
An Intel or AMD x64-64 based server - I am using an Intel NUC10i7FNK. I am really a fan of the NUC form factor computers because of their compact size.
You can use any machine that you like, as long as it has the following characteristics:
-
At least 4 cores which support SMT (aka Hyper Thread) - You need at least 8 vCPUs
The NUC10i7FNK has 6 cores, which is great for Kubernetes. However, they are getting a little older now and are harder to find.
I will eventually start looking at the NUC 12 line. Check out the NUC12WSKi5, you’ll get 12 cores with 16 threads (vCPUS)! Even the entry level will give you 12 vCPUs!
-
Minimum of 32GB of RAM for Single Node Openshift or 64GB of RAM for a full three node cluster
I highly encourage you to go with 64GB of RAM. The cost difference is not that much and the benefits of more RAM are huge.
-
1TB of SSD - either SATA or NVMe. Don’t use spinning disks. They are too slow.
You should be able to get a really nice lab setup for under $1,000 USD.
-
Install the labcli utilities for the Lab
I have created a companion project for this blog. It contains all of the shell functions that I use to ease the task of building and tearing down infrastructure in my lab.
-
Create a directory for all of your lab manifests and utilities:
mkdir -p ${HOME}/okd-lab/bin -
Create a temporary working directory:
WORK_DIR=$(mktemp -d) -
Clone the git repository that I have created with helper scripts:
git clone -b archive-2 https://github.com/cgruver/kamarotos.git ${WORK_DIR} -
Copy the helper scripts to
${HOME}/okd-lab:cp ${WORK_DIR}/bin/* ${HOME}/okd-lab/bin chmod 700 ${HOME}/okd-lab/bin/* -
Copy the lab configuration example files to ${HOME}/okd-lab/lab-config/examples
mkdir -p ${HOME}/okd-lab/lab-config/cluster-configs cp -r ${WORK_DIR}/examples ${HOME}/okd-lab/lab-config -
Copy the example files for single node OpenShift
cp ${HOME}/okd-lab/lab-config/examples/basic-lab-kvm-sno.yaml ${HOME}/okd-lab/lab-config cp ${HOME}/okd-lab/lab-config/examples/cluster-configs/sno-kvm-no-pi.yaml ${HOME}/okd-lab/lab-config/cluster-configs -
Create a symbolic link to use the config file for a single node OpenShift cluster.
ln -s ${HOME}/okd-lab/lab-config/basic-lab-kvm-sno.yaml ${HOME}/okd-lab/lab-config/lab.yaml -
Remove the temporary directory
rm -rf ${WORK_DIR} -
Add the following to your shell environment:
Your default shell will be something like
bashorzsh. Although you might have changed it.You need to add the following line to the appropriate shell file in your home directory:
.bashrc, or.zshrc, etc…Bash:
echo ". ${HOME}/okd-lab/bin/labEnv.sh" >> ~/.bashrcZsh:
echo ". ${HOME}/okd-lab/bin/labEnv.sh" >> ~/.zshrcNote: Take a look at the file
${HOME}/okd-lab/bin/labEnv.sh. It will set variables in your shell when you log in, so make sure you are comfortable with what it is setting. If you don’t want to add it to your shell automatically, the you will need to execute. ${HOME}/okd-lab/bin/labEnv.shbefore running any lab commands.It’s always a good practice to look at what a downloaded script is doing, since it is running with your logged in privileges… I know that you NEVER run one of those;
curl some URL | bash… without looking at the file first… right? -
Log off and back on to set the variables.
Review the configuration
I’m being intentionally prescriptive here to help ensure success the first time you try this. I have created a lab configuration for you based on the assumption that you have the minimal equipment for your first lab.
-
Your lab domain will be:
my.awesome.lab -
Your lab network will be:
10.11.12.0/24 -
These settings are in:
${HOME}/okd-lab/lab-config/lab.yamldomain: my.awesome.lab network: 10.11.12.0 router-ip: 10.11.12.1 netmask: 255.255.255.0 centos-mirror: rsync://mirror.facebook.net/centos-stream/ sub-domain-configs: [] cluster-configs: - name: dev cluster-config-file: sno-kvm-no-pi.yaml domain: edge -
The configuration file for your OpenShift cluster is in: `${HOME}/okd-lab/lab-config/cluster-configs/sno-kvm-no-pi.yaml
cluster:
  name: okd4-sno
  cluster-cidr: 10.88.0.0/14
  service-cidr: 172.20.0.0/16
  remote-registry: quay.io/openshift/okd
  butane-version: v0.16.0
  butane-spec-version: 1.4.0
  butane-variant: fcos
  ingress-ip-addr: 10.11.12.2
bootstrap:
  metal: false
  node-spec:
    memory: 12288
    cpu: 4
    root-vol: 50
  kvm-host: kvm-host01
  ip-addr: 10.11.12.49
control-plane:
  metal: false
  node-spec:
    memory: 61440
    cpu: 12
    root-vol: 800
  okd-hosts:
    - kvm-host: kvm-host01
      ip-addr: 10.11.12.60
kvm-hosts:
  - host-name: kvm-host01
    mac-addr: "YOUR_HOST_MAC_HERE"
    ip-addr: 10.11.12.200
    disks:
      disk1: nvme0n1
      disk2: NA
Note: You will need to replace
YOUR_HOST_MAC_HEREwith the MAC address of your server. We’ll do that later when we get ready to install OpenShift.
Note: If you want different network settings, or a different domain, change these two files accordingly. However, I highly encourage you to deploy the lab at least once with the prescriptive configuration. This will get you familiar with how I’ve set it up. Trust me, it’s really easy to tear it down and rebuild it.
Install yq
We will need the yq utility for YAML file manipulation: https://mikefarah.gitbook.io/yq/
-
MacOS:
brew install yq -
Linux:
mkdir ${OKD_LAB_PATH}/yq-tmp
YQ_VER=$(basename $(curl -Ls -o /dev/null -w %{url_effective} https://github.com/mikefarah/yq/releases/latest))
wget -O ${OKD_LAB_PATH}/yq-tmp/yq.tar.gz https://github.com/mikefarah/yq/releases/download/${YQ_VER}/yq_linux_amd64.tar.gz
tar -xzf ${OKD_LAB_PATH}/yq-tmp/yq.tar.gz -C ${OKD_LAB_PATH}/yq-tmp
cp ${OKD_LAB_PATH}/yq-tmp/yq_linux_amd64 ${OKD_LAB_PATH}/bin/yq
chmod 700 ${OKD_LAB_PATH}/bin/yq
Create an SSH Key Pair
-
If you don’t have an SSH key pair configured on your workstation, then create one now:
ssh-keygen -t rsa -b 4096 -N "" -f ${HOME}/.ssh/id_rsa -
Copy the SSH public key to the Lab configuration folder:
cp ~/.ssh/id_rsa.pub ${OKD_LAB_PATH}/ssh_key.pub -
Now, you are ready to set up your lab network:
Configure the Lab Network
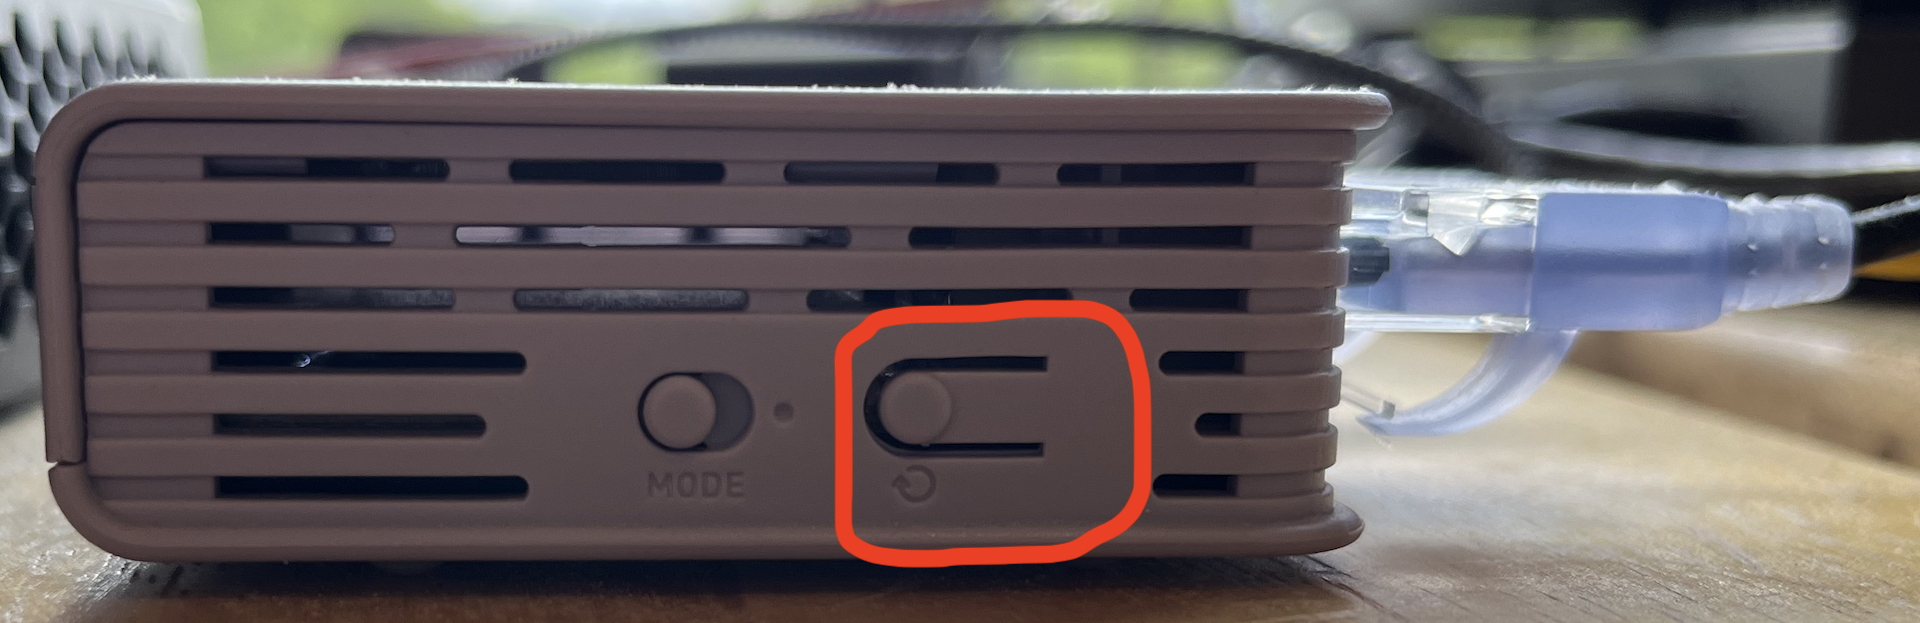
Note: If at any time you need to reset the router, or any of the below commands fail and need to be rerun, do this:
Hold the highlighted button for about 10 seconds. When you first press the button, the left most LED will start to slowly blink. After about 3-4 seconds it will blink a bit faster. After about 9-10 seconds it will blink really fast. At this point, let go of the button. Your router will factory reset itself. The router pictured here in a GL-iNet AR750S, however most GL-iNet routers have the same button configuration.
We are going to hang your lab network off of your home network. We’re doing this for a couple of reasons.
-
It keeps the lab portable. By using an existing network as our internet gateway, we can disconnect and move to another network at any time.
-
It keeps the peace in your household. Our network will be serving DHCP, DNS, and a host of other services. By isolating it from your general use network, we avoid any interference with other activities.
Set Up The Router
-
Insert the SD Card into the slot on your router.
Don’t worry about the format of the card. The lab scripts will format it.
Note: Do not use an SD Card with data on it that you want to keep. The card will be formatted during initialization.
-
Connect to your lab router:
- Power it on and connect to it from your workstation.
- With the
GL-AXT1800you can connect to the WiFi. The initial SSID and passphrase are on the back of the router. Otherwise, connect from your workstation with a network cable. - Ensure that you can ping the router:
ping 192.168.8.1
-
Enable password-less SSH to the router:
cat ${OKD_LAB_PATH}/ssh_key.pub | ssh root@192.168.8.1 "cat >> /etc/dropbear/authorized_keys" -
Set a root password on your router:
Point your browser at https://192.168.8.1.
You should see the welcome page for the router. Select you preferred language and set a password for the router.
-
Connect your router to the internet:
The
GL-AXT1800can be connected to your home network via cable, or wireless repeater. You’ll get the fastest speeds with a hard wire to your home router, but that also limits the placement of your lab. Repeater mode on theGL-AXT1800is surprisingly fast. That is how I am using it.-
Set up Repeater Mode:
Return to https://192.168.8.1.
-
Select
Connectfrom the Repeater configuration menu in the lower left of the main page. -
Choose the wireless network that you want to connect to, and enter the appropriate passphrase.
-
Re-connect to your router’s wireless network.
-
-
Set your shell environment for managing the lab:
labctx dev -
Initialize the router configuration:
labcli --router -i -eWhen the configuration is complete, the router will reboot.
-
Wait for the router to reboot, and then reconnect to your new lab network.
-
Make sure that you have internet connectivity through the router:
ping google.com -
Finish configuring the router:
labcli --router -s -e -fWhen the configuration is complete, the router will reboot again.
-
Wait for the router to reboot, and then reconnect to your new lab network.
Note: When you update the firmware on your router, you will need to run all of the above steps again. However, to preserve the data on the SD Card, leave out the
-foption. By doing so, you will not lose your DNS configuration or the CentOS Stream repo synch. -
Verify that DNS is working properly:
ping google.com
Prepare to Install CentOS Stream on Your KVM Host
-
Create a mirror of the CentOS Stream repo on your router:
ssh -o StrictHostKeyChecking=no -o UserKnownHostsFile=/dev/null root@10.11.12.1 "nohup /root/bin/MirrorSync.sh &"This process will run in the background and will take quite a while to complete. Depending on network speed, this could take an hour or more.
You can check on the progress of the CentOS Stream synch by following the log at
/usr/local/MirrorSync.log -
Once the CentOS Stream repository has finished synching, go on to the next section to set up your KVM host.
Set Up KVM Host
-
Create a default root password for your KVM hosts:
labcli --kvm-pwd -
Read the
MACaddress off of the bottom of the NUC and add it to the cluster config file:Edit
${HOME}/okd-lab/lab-config/domain-configs/sno-kvm-no-pi.yamland replaceYOUR_HOST_MAC_HEREwith the MAC address of your NUC.Note: Use lower case letters in the MAC.
-
You need to know whether you have NVME or SATA SSDs in the NUC.
-
If you have an NVME drive installed in the NUC, you do not need to modify anything.
-
If you have SATA M.2 drive instead of NVME then edit:
${OKD_LAB_PATH}/lab-config/domain-configs/sno-kvm-no-pi.yaml, and replacenvme0n1withsda. -
If you have more than one drive installed and you want to use all of them for storage, then edit:
${OKD_LAB_PATH}/lab-config/domain-configs/sno-kvm-no-pi.yaml, and replacedisk2: NAwithdisk2: nvme0n2ordisk2: sdbas appropriate
-
Once you have completed the configuration file changes, Deploy the KVM hosts:
-
Prepare for the CentOS Stream install:
labcli --deploy -kThis command will configure the
iPXEandkickstartfiles for you as well as create the appropriateDNSrecords. -
We are now ready to plug in the NUC and boot it up.
Note: This is the point at which you might have to attach a keyboard and monitor to your NUC. We need to ensure that the BIOS is set up to attempt a Network Boot with UEFI, not legacy. You also need to ensure that
Secure Bootis disabled in the BIOS since we are not explicitly trusting the boot images.Also, Take this opportunity to apply the latest BIOS to your NUC.__ You won’t need the keyboard or mouse again, until it’s time for another BIOS update… Eventually we’ll figure out how to push those from the OS too.
-
Make sure that the KVM host is connected to your network and power it on.
At this point, it should PXE boot off of the router, and start an unattended install of CentOS Stream.
Attach a monitor and keyboard if you want to watch.
- The host will power on and find no bootable OS
- The host will attempt a network boot by requesting a DHCP address and PXE boot info
- The DHCP server will issue an IP address and direct the host to the PXE boot file on the TFTP boot server
- The host will retrieve the
boot.ipxefile from the TFTP boot server - The
boot.ipxescript will then retrieve an iPXE script name from the MAC address of the host. - The host will begin booting:
- The host will retrieve the
vmlinuz, andinitrdfiles from the HTTP install server - The host will load the kernel and init-ram
- The host will retrieve the kickstart file or ignition config file depending on the install type.
- The host will retrieve the
- The host should now begin an unattended install.
We are now ready to deploy our Single Node OpenShift cluster
-
Pull the latest release binaries for OKD:
labcli --latest -
Deploy the configuration in preparation for the install:
labcli --deploy -cThis command does a lot of work for you.
- It creates the OpenShift install manifests.
- It uses the
butanecli to inject custom configurations into the ignition configs for the cluster nodes. - It creates the appropriate DNS entries and network configuration.
- It prepares the iPXE boot configuration for each cluster node.
-
Start the bootstrap node:
labcli --start -b -
Start the control-plane node:
labcli --start -m -
Monitor the bootstrap process:
labcli --monitor -bNote: This command does not affect the install process. You can stop and restart it safely. It is just for monitoring the bootstrap.
Also Note: It will take a while for this command to stop throwing connection errors. You are effectively waiting for the bootstrap node to install its OS and start the bootstrap process. Be patient, and don’t worry.
If you want to watch logs for issues:
labcli --monitor -jThis command tails the journal log on the bootstrap node.
-
You will see the following, when the bootstrap is complete:
DEBUG Still waiting for the Kubernetes API: Get "https://api.okd4.my.awesome.lab:6443/version": read tcp 10.11.12.227:49643->10.11.12.2:6443: read: connection reset by peer - error from a previous attempt: read tcp 10.11.12.227:49642->10.11.12.2:6443: read: connection reset by peer INFO API v1.25.0-2786+eab9cc98fe4c00-dirty up DEBUG Loading Install Config... DEBUG Loading SSH Key... DEBUG Loading Base Domain... DEBUG Loading Platform... DEBUG Loading Cluster Name... DEBUG Loading Base Domain... DEBUG Loading Platform... DEBUG Loading Networking... DEBUG Loading Platform... DEBUG Loading Pull Secret... DEBUG Loading Platform... DEBUG Using Install Config loaded from state file INFO Waiting up to 30m0s (until 10:06AM) for bootstrapping to complete... DEBUG Bootstrap status: complete INFO It is now safe to remove the bootstrap resources DEBUG Time elapsed per stage: DEBUG Bootstrap Complete: 17m10s DEBUG API: 4m9s INFO Time elapsed: 17m10s -
When the bootstrap process is complete, remove the bootstrap node:
labcli --destroy -bThis script shuts down and then deletes the Bootstrap VM. Then it removes the bootstrap entries from the DNS and network configuration.
-
Monitor the installation process:
labcli --monitor -iNote: This command does not affect to install process. You can stop and restart it safely. It is just for monitoring.
-
Installation Complete:
DEBUG Cluster is initialized
INFO Waiting up to 10m0s for the openshift-console route to be created...
DEBUG Route found in openshift-console namespace: console
DEBUG OpenShift console route is admitted
INFO Install complete!
INFO To access the cluster as the system:admin user when using 'oc', run 'export KUBECONFIG=/Users/yourhome/okd-lab/okd-install-dir/auth/kubeconfig'
INFO Access the OpenShift web-console here: https://console-openshift-console.apps.okd4.my.awesome.lab
INFO Login to the console with user: "kubeadmin", and password: "AhnsQ-CGRqg-gHu2h-rYZw3"
DEBUG Time elapsed per stage:
DEBUG Cluster Operators: 13m49s
INFO Time elapsed: 13m49s
Post Install
-
Post Install Cleanup:
labcli --post -
Trust the cluster certificates:
labcli --trust -c -
Add Users:
Note: Make sure that the htpasswd command is installed on your system. It should be included by default on Mac OS. For Fedora, RHEL, or CentOS:
dnf install httpd-toolsAdd a cluster-admin user:
labcli --user -i -a -u=adminNote: You can ignore the warning:
Warning: User 'admin' not foundAdd a non-privileged user:
labcli --user -u=devuserNote: It will take a couple of minutes for the
authenticationservices to restart after you create these user accounts.Note: This deletes the temporary
kubeadminaccount. Youradminuser will now have cluster admin rights.
Install The Hostpath Provisioner Operator as a storage Provisioner
-
Log into your cluster:
oc login -u admin https://api.okd4-sno.my.awesome.lab:6443Note: Use the
adminpassword for the user that you created above. -
Install the Cert Manager Operator (Dependency)
oc create -f https://github.com/cert-manager/cert-manager/releases/download/v1.8.0/cert-manager.yaml -
Wait for the operator to install:
oc wait --for=condition=Available -n cert-manager --timeout=120s --all deployments -
Install the Hostpath Provisioner:
oc create -f https://raw.githubusercontent.com/kubevirt/hostpath-provisioner-operator/release-v0.15/deploy/namespace.yaml oc create -f https://raw.githubusercontent.com/kubevirt/hostpath-provisioner-operator/release-v0.15/deploy/webhook.yaml -n hostpath-provisioner oc create -f https://raw.githubusercontent.com/kubevirt/hostpath-provisioner-operator/release-v0.15/deploy/operator.yaml -n hostpath-provisioner -
Create an instance of the Hostpath Provisioner:
cat << EOF | oc apply -f - apiVersion: hostpathprovisioner.kubevirt.io/v1beta1 kind: HostPathProvisioner metadata: name: hostpath-provisioner spec: imagePullPolicy: Always storagePools: - name: "local" path: "/var/hostpathvolumes" workload: nodeSelector: kubernetes.io/os: linux EOF -
Create a StorageClass:
cat << EOF | oc apply -f -
apiVersion: storage.k8s.io/v1
kind: StorageClass
metadata:
  name: hostpath-csi
  annotations:
    storageclass.kubernetes.io/is-default-class: "true"
provisioner: kubevirt.io.hostpath-provisioner
reclaimPolicy: Delete
volumeBindingMode: WaitForFirstConsumer
parameters:
  storagePool: local
EOF
Create a Storage Volume for the Internal Image Registry
Verify that the Hostpath Provisioner is working by creating a PersistentVolumeClaim for the OpenShift internal image registry.
-
Create the PVC:
cat << EOF | oc apply -f - apiVersion: v1 kind: PersistentVolumeClaim metadata: name: registry-pvc namespace: openshift-image-registry spec: accessModes: - ReadWriteOnce resources: requests: storage: 100Gi storageClassName: hostpath-csi EOF -
Patch the internal image registry to use the new PVC:
oc patch configs.imageregistry.operator.openshift.io cluster --type merge --patch '{"spec":{"rolloutStrategy":"Recreate","managementState":"Managed","storage":{"pvc":{"claim":"registry-pvc"}}}}'
That’s it!
Have fun with OpenShift
Next time, I’ll show you how to use this same setup to build a three node cluster with Ceph as the storage provisioner.