Try To Pull Yourself Up By Your Bootstraps - Without Falling Over…
Single Node OpenShift…
Unattended Install…
With no bootstrap node…
On bare metal…
First… Listen to this. One of my all time favorite songs. It will get you in a bare metal mood: Red: Let It Burn
Ok… Now that you know more about me than you wanted to… Let’s build it!!!
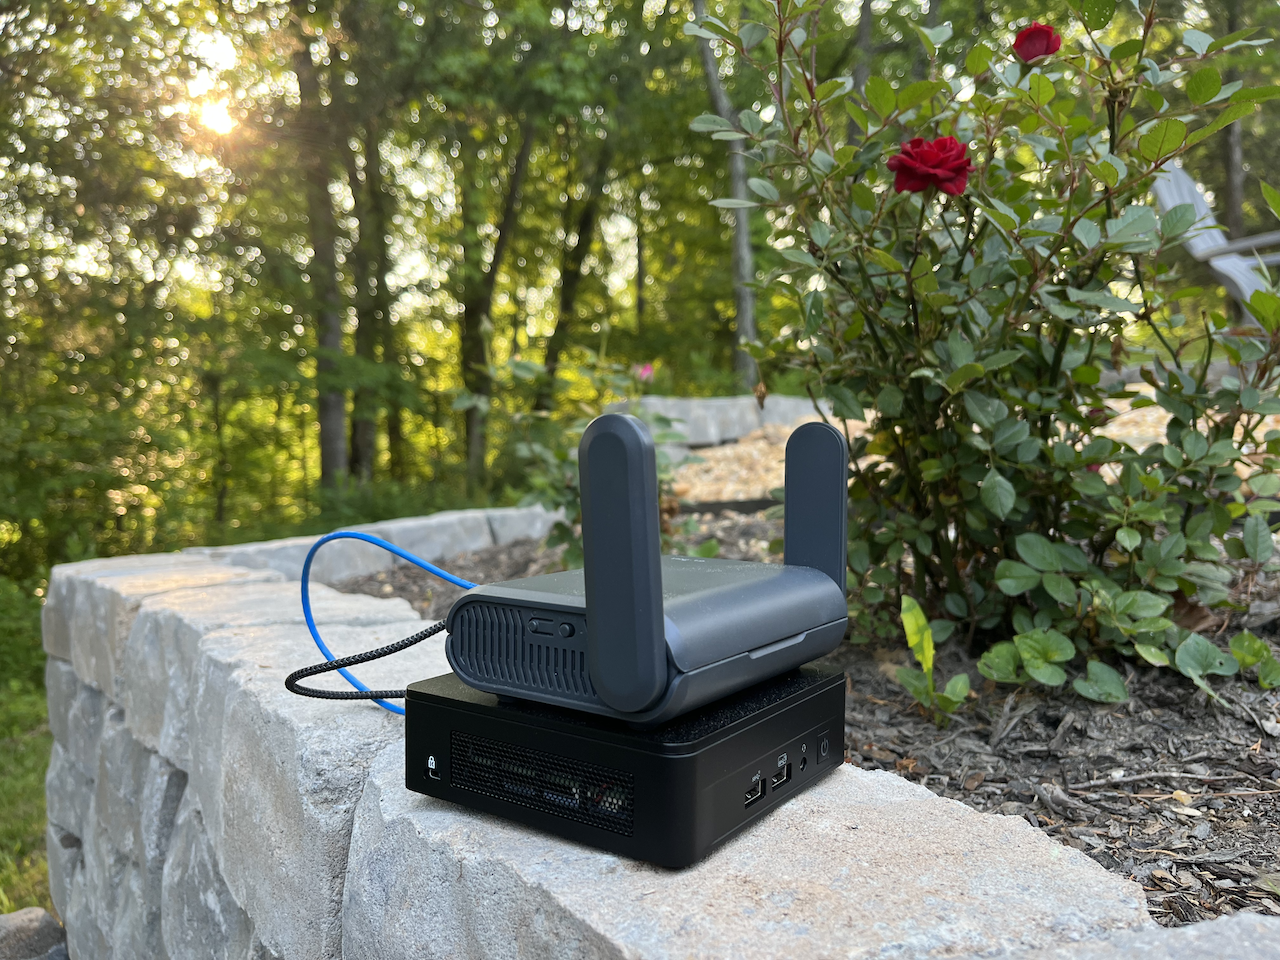
Required Equipment
This particular lab tutorial is highly opinionated toward a specific set of gear. However, you should be able to make other configurations work.
This is the BOM that I used for this lab:
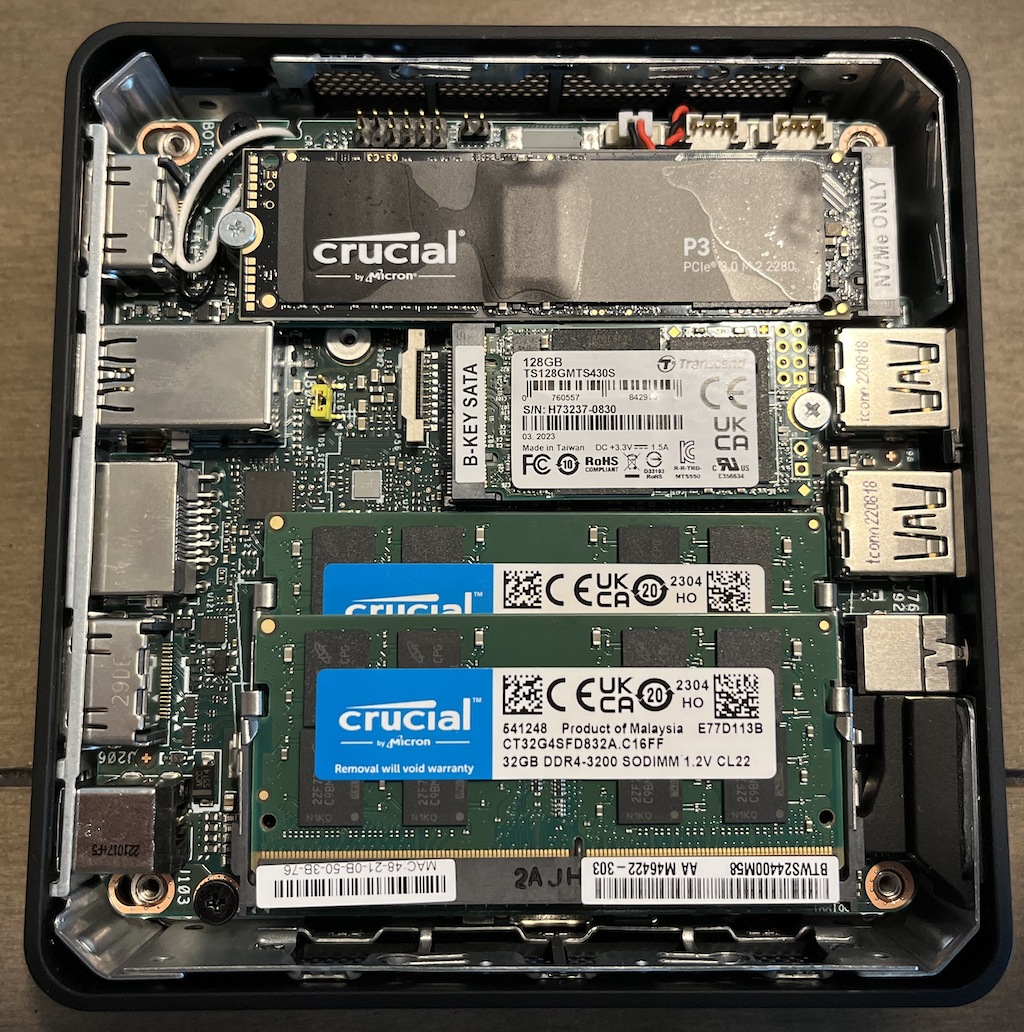
- NUC12WSKi7
- Crucial 64GB Kit DDR4 3200 MHz SO-DIMM
- Crucial 1TB P3 NVMe PCIe 3.0 M.2 Internal SSD
- Transcend 128GB SATA III 6Gb/s MTS430S 42 mm M.2 SSD Solid State Drive
- GL.iNet GL-AXT1800
My whole setup cost ~$920 USD + local sales tax.
Install the labcli utilities for the Lab
I have created a companion project for this blog. It contains all of the shell functions that I use to ease the task of building and tearing down infrastructure in my lab.
Follow the install instructions here: Command Line Interface for your Kubernetes (OpenShift) Home Lab
Configure your lab for Single Node OpenShift - Bootstrap In Place
-
Copy the example files for single node OpenShift/BIP
cp ${HOME}/okd-lab/lab-config/examples/basic-lab-bip-sno.yaml ${HOME}/okd-lab/lab-config cp ${HOME}/okd-lab/lab-config/examples/cluster-configs/sno-bip-no-pi.yaml ${HOME}/okd-lab/lab-config/cluster-configs -
Create a symbolic link to use the config file for a single node OpenShift cluster.
ln -s ${HOME}/okd-lab/lab-config/basic-lab-bip-sno.yaml ${HOME}/okd-lab/lab-config/lab.yaml
Review the configuration
I’m being intentionally prescriptive here to help ensure success the first time you try this. I have created a lab configuration for you based on the assumption that you have the equipment listed above.
-
Your lab domain will be:
my.awesome.lab -
Your lab network will be:
10.11.12.0/24 -
These settings are in:
${HOME}/okd-lab/lab-config/lab.yamldomain: my.awesome.lab network: 10.11.12.0 router-ip: 10.11.12.1 netmask: 255.255.255.0 centos-mirror: rsync://mirror.facebook.net/centos-stream/ install-host: router sub-domain-configs: [] cluster-configs: - name: dev cluster-config-file: sno-bip-no-pi.yaml domain: edge -
The configuration file for your OpenShift cluster is in:
${HOME}/okd-lab/lab-config/cluster-configs/sno-bip-no-pi.yamlcluster: name: okd4-sno cluster-cidr: 10.88.0.0/14 service-cidr: 172.20.0.0/16 remote-registry: quay.io/openshift/okd butane-spec-version: 1.4.0 butane-variant: fcos disconnected: false control-plane: metal: true okd-hosts: - ip-addr: 10.11.12.60 imac-addr: YOUR_HOST_MAC_HERE boot-dev: /dev/nvme0n1 sno-install-dev: /dev/sda hostpath-dev: /dev/nvme0n1Note: You will need to replace
YOUR_HOST_MAC_HEREwith the MAC address of your server. We’ll do that later when we get ready to install OpenShift.
Note: If you want different network settings, or a different domain, change these two files accordingly. However, I highly encourage you to deploy the lab at least once with the prescriptive configuration. This will get you familiar with how I’ve set it up. Trust me, it’s really easy to tear it down and rebuild it.
Configure the Lab Network
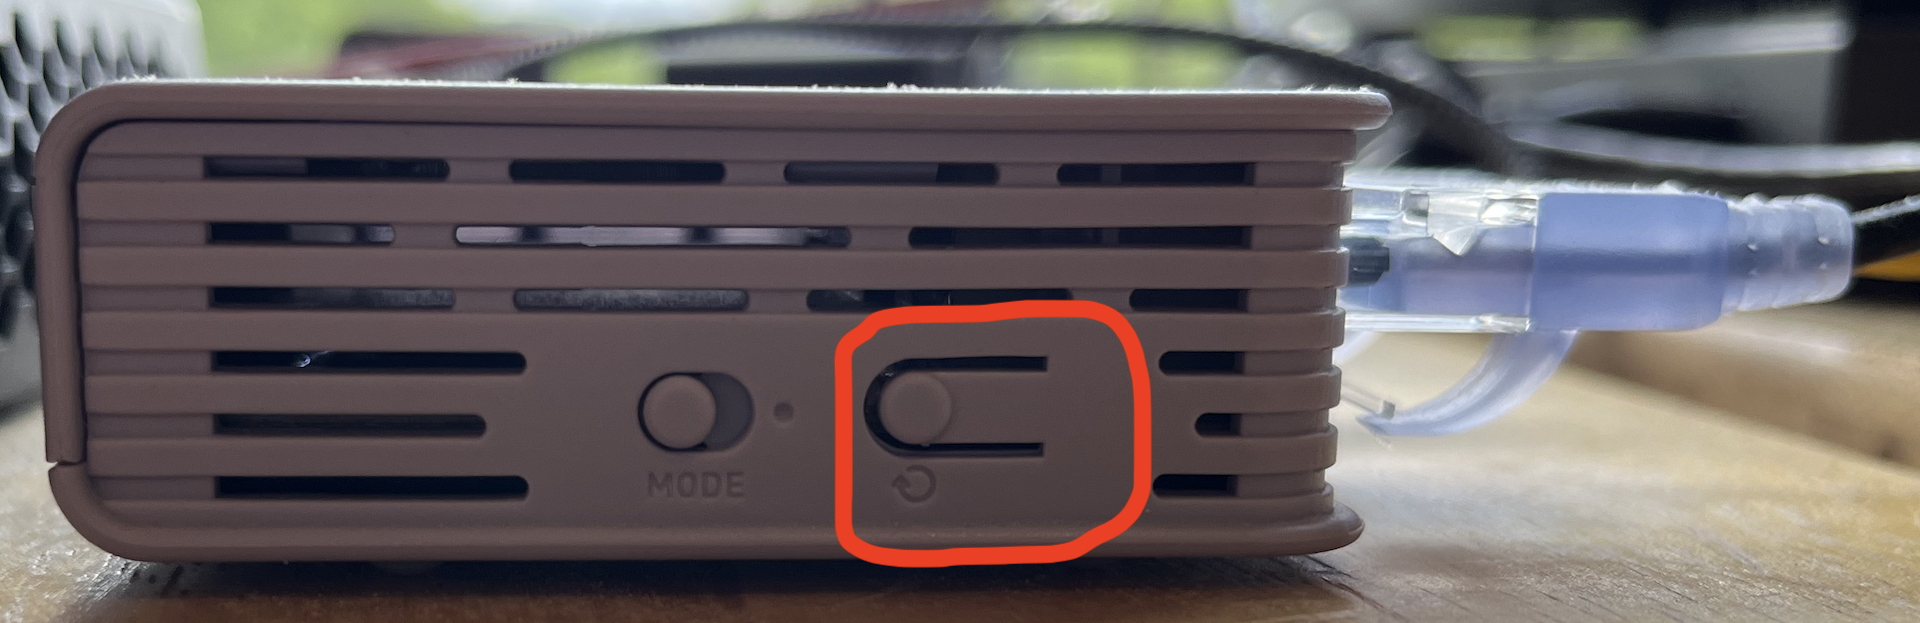
Note: If at any time you need to reset the router, or any of the below commands fail and need to be rerun, do this:
Hold the highlighted button for about 10 seconds. When you first press the button, the left most LED will start to slowly blink. After about 3-4 seconds it will blink a bit faster. After about 9-10 seconds it will blink really fast. At this point, let go of the button. Your router will factory reset itself. The router pictured here in a GL-iNet AR750S, however most GL-iNet routers have the same button configuration.
We are going to hang your lab network off of your home network. We’re doing this for a couple of reasons.
-
It keeps the lab portable. By using an existing network as our internet gateway, we can disconnect and move to another network at any time.
-
It keeps the peace in your household. Our network will be serving DHCP, DNS, and a host of other services. By isolating it from your general use network, we avoid any interference with other activities.
Set Up The Router
-
Insert the SD Card into the slot on your router.
Don’t worry about the format of the card. The lab scripts will format it.
Note: Do not use an SD Card with data on it that you want to keep. The card will be formatted during initialization.
-
Connect to your lab router:
- Power it on and connect to it from your workstation.
- With the
GL-AXT1800you can connect to the WiFi. The initial SSID and passphrase are on the back of the router. Otherwise, connect from your workstation with a network cable. - Ensure that you can ping the router:
ping 192.168.8.1
-
Enable password-less SSH to the router:
cat ${OKD_LAB_PATH}/ssh_key.pub | ssh root@192.168.8.1 "cat >> /etc/dropbear/authorized_keys" -
Set a root password on your router:
Point your browser at https://192.168.8.1.
You should see the welcome page for the router. Select you preferred language and set a password for the router.
-
Connect your router to the internet:
The
GL-AXT1800can be connected to your home network via cable, or wireless repeater. You’ll get the fastest speeds with a hard wire to your home router, but that also limits the placement of your lab. Repeater mode on theGL-AXT1800is surprisingly fast. That is how I am using it.-
Set up Repeater Mode:
Return to https://192.168.8.1.
-
Select
Connectfrom the Repeater configuration menu in the lower left of the main page. -
Choose the wireless network that you want to connect to, and enter the appropriate passphrase.
-
Re-connect to your router’s wireless network.
-
-
Set your shell environment for managing the lab:
labctx dev -
Initialize the router configuration:
labcli --router -i -eWhen the configuration is complete, the router will reboot.
-
Wait for the router to reboot, and then reconnect to your new lab network.
-
Make sure that you have internet connectivity through the router:
ping google.com -
Finish configuring the router:
labcli --router -s -e -fWhen the configuration is complete, the router will reboot again.
-
Wait for the router to reboot, and then reconnect to your new lab network.
Note: When you update the firmware on your router, you will need to run all of the above steps again. However, to preserve the data on the SD Card, leave out the
-foption. By doing so, you will not lose your DNS configuration or the CentOS Stream repo synch. -
Verify that DNS is working properly:
ping google.com
Prepare Your Server
- Attach a keyboard and monitor to your NUC.
- Power it on and enter the BIOS setup by pressing
F2 - Ensure that the BIOS is set up to attempt a Network Boot with UEFI
- Set the BIOS for unlimited Network Boot Attepmts
- Set the BIOS to Boot Network Devices last
- Ensure that
Secure Bootis disabled in the BIOS since we are not explicitly trusting the boot images - Save the BIOS settings
- Power off the server
Also, Take this opportunity to apply the latest BIOS to your NUC. You won’t need the keyboard or mouse again, until it’s time for another BIOS update.
We are now ready to deploy our Single Node OpenShift cluster
-
Put the MAC address of your server into the config file:
Edit
${HOME}/okd-lab/lab-config/cluster-configs/sno-bip-no-pi.yamland replaceYOUR_HOST_MAC_HEREwith the MAC address of your server. -
Set all of the environment variables:
labctx dev` -
Pull the latest release binaries for OKD and
butane:labcli --latest -
Deploy the configuration in preparation for the install:
labcli --deploy -cThis command does a lot of work for you.
- It creates the OpenShift install manifests.
- It uses the
butanecli to inject custom configurations into the ignition configs for the OpenShift cluster nodes. - It creates the appropriate DNS entries and network configuration.
- It prepares the iPXE boot configuration for each cluster node.
-
Start the server:
labcli --start -mSince we are doing a bare metal install, this command uses Wake On Lan to power on your NUC.
-
Watch the logs on the NUC:
Open a new terminal and run:
labctx dev
watch labcli --monitor -m=0
This command tails the journal logs on the node. The
watchcommand in front of the labcli command ensures that the journal tail will restart after every system reboot.Note: The system will reboot several times during this process.
-
Monitor the installation process:
Open yet another terminal and run:
labctx dev
labcli --monitor -i
Note: This command does not affect the install process. You can stop and restart it safely. It is just for monitoring the install.
It will take a while for this command to stop throwing connection errors.
At certain points, this command will display
DEBUGmessages which look like errors. Ignore them.On my home network, (which is not the fastest on the planet…), the whole install process takes about 45 minutes.
Be patient, and don’t worry.
-
This is going to take a while. So, let’s talk about how it works.
How This Install Method Works
The bootstrap in place install is a two stage process.
The first stage is like a mini-boostrap. It generates all of the manifests needed for the OpenShift cluster and creates the base file systems.
The second stage pivots the machine to boot from the newly created file systems and completes the install.
There is an official method which uses a generated ISO to boot and prep the system. It does not require two drives like the method we are using does. But, it requires more upfront preparation to run the assisted installer and generate the ISO. You can read about it here: Deploy Single-Node Kubernetes at the Edge with OpenShift
The main difference with the method that I am using is that it does not generate a system specific ISO image. Instead, it boots from a common Fedora CoreOS image with iPXE and consumes a system specific ignition configuration.
The ignition config is generated by my labcli --deploy scripts. You can see the bulk of the applied customizations here: https://github.com/cgruver/kamarotos/blob/main/bin/clusterButaneConfig.sh
The TL;DR for this install method is that it uses two internal disks to complete the install. The first disk is used by the mini-bootstrap phase which gets its configuration via iPXE. This phase does the initial boot and preparation of the system. It writes all of the manifests and operating system components needed to complete the install to the second disk. The system then boots off of the second disk and completes the install.
I had to overcome a couple of challenges to make this work:
-
The system has no way of knowing which disk to boot from after the first phase is complete.
When the mini-bootstrap phase is complete. The system now has two bootable disks. I did not want to have to manually intervene to adjust the boot priority in the BIOS. So, I came up with another method. Since the first disk is only used for the initial boot and preparation, it no longer needs an OS installed on it. I also planned to use it to provide persistent storage to applications running on the cluster. So, I added a process to the ignition config that wipes the partition and filesystem information from the initial boot disk when that part of the install is complete. When the system reboots, it only has one bootable drive and can complete the install unattended.
I also added a
MachineConfigto the ignition file which creates a filesystem on the initial boot disk that can be used by the Hostpath Provisioner Operator. -
The other issue that I had to overcome was persisting the network configuration between the initial boot and the final install.
I am using static network configurations for this particular lab. I solved this issue by including the network config in the ignition in two ways. The first is a files in the config that are applied to the initial system boot. The second is a
MachineConfigwhich is applied during the final install phase. -
There’s also a temporary issue with the OKD release version that I am using. During part of the install it boots from a FCOS 38 image before pivoting back to an FCOS 37 image. This results in a corruption of the Journal logs which has to be cleaned up before the Machine Config Operator can come up cleanly. OKD SNO Bootstrap In Place fails to complete because of corrupted Journal file
The resulting customizations that are added to the ignition config generated by the installer, look like this:
variant: fcos
version: 1.4.0
ignition:
  config:
    merge:
      - local: sno.ign
storage:
  files:
    - path: /etc/zincati/config.d/90-disable-feature.toml
      mode: 0644
      contents:
        inline: |
          [updates]
          enabled = false
    - path: /etc/systemd/network/25-nic0.link
      mode: 0644
      contents:
        inline: |
          [Match]
          MACAddress=48:21:0b:50:35:c7
          [Link]
          Name=nic0
    - path: /etc/NetworkManager/system-connections/nic0.nmconnection
      mode: 0600
      overwrite: true
      contents:
        inline: |
          [connection]
          type=ethernet
          interface-name=nic0

          [ethernet]
          mac-address=48:21:0b:50:35:c7

          [ipv4]
          method=manual
          addresses=10.11.12.60/24
          gateway=10.11.12.1
          dns=10.11.12.1
          dns-search=my.awesome.lab
    - path: /etc/hostname
      mode: 0420
      overwrite: true
      contents:
        inline: |
          okd4-sno-node.my.awesome.lab
    - path: /etc/chrony.conf
      mode: 0644
      overwrite: true
      contents:
        inline: |
          pool 10.11.12.1 iburst
          driftfile /var/lib/chrony/drift
          makestep 1.0 3
          rtcsync
          logdir /var/log/chrony
    - path: /opt/openshift/openshift/98_openshift-machineconfig_98-master-config-bip.yaml
      mode: 0644
      overwrite: true
      contents:
        inline: |
          # Generated by Butane; do not edit
          apiVersion: machineconfiguration.openshift.io/v1
          kind: MachineConfig
          metadata:
            labels:
              machineconfiguration.openshift.io/role: master
            name: config-bip
          spec:
            config:
              ignition:
                version: 3.2.0
              storage:
                files:
                  - contents:
                      compression: ""
                      source: data:,%5Bupdates%5D%0Aenabled%20%3D%20false%0A
                    mode: 420
                    path: /etc/zincati/config.d/90-disable-feature.toml
                  - contents:
                      compression: ""
                      source: data:;base64,W01hdGNoXQpNQUNBZGRyZXNzPTQ4OjIxOjBiOjUwOjM1OmM3CltMaW5rXQpOYW1lPW5pYzAK
                    mode: 420
                    path: /etc/systemd/network/25-nic0.link
                  - contents:
                      compression: gzip
                      source: data:;base64,H4sIAAAAAAAC/1yKTY6DIBTH9+8uMuDoTEPCSYyLJ/xbSeRhgNZ4+27aNOny9zH5LALfYpaZ2rnDoa0ogkZRGsqVPTrhBCfRa6LpnWdK7DsOoaBWN1xsb6xe7Kjt72j9P9EU98cwU0Jbc3CJ5c4bvX5UZ7QyRple/emffqAbNxx8frShIPULuwoufnXpVHyg5gS18ULPAAAA//+KH/mzxAAAAA==
                    mode: 384
                    overwrite: true
                    path: /etc/NetworkManager/system-connections/nic0.nmconnection
                  - contents:
                      compression: ""
                      source: data:,okd4-sno-node.my.awesome.lab%0A
                    mode: 272
                    overwrite: true
                    path: /etc/hostname
                  - contents:
                      compression: ""
                      source: data:,pool%2010.11.12.1%20iburst%20%0Adriftfile%20%2Fvar%2Flib%2Fchrony%2Fdrift%0Amakestep%201.0%203%0Artcsync%0Alogdir%20%2Fvar%2Flog%2Fchrony%0A
                    mode: 420
                    overwrite: true
                    path: /etc/chrony.conf
              systemd:
                units:
                  - contents: |
                      [Unit]
                      Description=Make File System on /dev/nvme0n1
                      DefaultDependencies=no
                      BindsTo=dev-nvme0n1.device
                      After=dev-nvme0n1.device var.mount
                      Before=systemd-fsck@dev-nvme0n1.service

                      [Service]
                      Type=oneshot
                      RemainAfterExit=yes
                      ExecStart=/usr/lib/systemd/systemd-makefs ext4 /dev/nvme0n1
                      TimeoutSec=0

                      [Install]
                      WantedBy=hostpath.mount
                    enabled: true
                    name: systemd-mkfs@dev-nvme0n1.service
                  - contents: |
                      [Unit]
                      Description=Mount /dev/nvme0n1 to /var/hostpath
                      Before=local-fs.target
                      Requires=systemd-mkfs@dev-nvme0n1.service
                      After=systemd-mkfs@dev-nvme0n1.service

                      [Mount]
                      What=/dev/nvme0n1
                      Where=/var/hostpath
                      Type=ext4
                      Options=defaults

                      [Install]
                      WantedBy=local-fs.target
                    enabled: true
                    name: var-hostpath.mount
                  - contents: |
                      [Unit]
                      Description=Clear Journal to Remove Corrupt File
                      DefaultDependencies=no
                      After=kubelet.service

                      [Service]
                      Type=oneshot
                      RemainAfterExit=yes
                      ExecStart=bash -c "/usr/bin/journalctl --rotate && /usr/bin/journalctl --vacuum-time=1s"
                      TimeoutSec=0

                      [Install]
                      WantedBy=multi-user.target
                    enabled: true
                    name: systemd-clear-journal.service
systemd:
  units:
  - contents: |
      [Unit]
      Description=Wipe Boot Disk After BootKube Completes
      Wants=bootkube.service
      After=bootkube.service
      ConditionPathExists=/opt/openshift/.bootkube.done

      [Service]
      WorkingDirectory=/
      ExecStart=/bin/bash -c "/usr/sbin/wipefs -af /dev/nvme0n1 && /usr/sbin/reboot"

      [Install]
      WantedBy=multi-user.target
    enabled: true
    name: wipe-boot-dev.service
Completing the Install
Now that We’ve burned some time talking about the install. Let’s grab a beverage and wait for it to complete.
When the install finally completes. You will see the following output from labcli --monitor -i
   DEBUG Still waiting for the cluster to initialize: Cluster operators authentication, console, kube-apiserver, monitoring are not available
   DEBUG Still waiting for the cluster to initialize: Cluster operators authentication, console, monitoring are not available
   DEBUG Still waiting for the cluster to initialize: Cluster operators authentication, console, monitoring are not available
   DEBUG Still waiting for the cluster to initialize: Cluster operators authentication, console, image-registry are not available
   DEBUG Cluster is initialized
   INFO Checking to see if there is a route at openshift-console/console...
   DEBUG Route found in openshift-console namespace: console
   DEBUG OpenShift console route is admitted
   INFO Install complete!
   INFO To access the cluster as the system:admin user when using 'oc', run 'export KUBECONFIG=/Users/charrogruver/okd-lab/okd4-sno.my.awesome.lab/okd-install-dir/auth/kubeconfig'
   INFO Access the OpenShift web-console here: https://console-openshift-console.apps.okd4-sno.my.awesome.lab
   INFO Login to the console with user: "kubeadmin", and password: "4HgUn-DgBq6-ABpM6-LtG8Q"
   DEBUG Time elapsed per stage:
   DEBUG Cluster Operators: 10m26s
   INFO Time elapsed: 10m26s
Post Install
-
Post Install Cleanup:
labcli --postThis command just removes completed pods and patches the Operator Hub components
-
Trust the cluster certificates:
labcli --trust -cSince our cluster has self-signed certs, we need to trust them on our workstation.
-
Add Users:
Now, let’s get rid of the temporary
kubeadminuser and create a cluster administrator, and a developer.Note: Make sure that the htpasswd command is installed on your system. It should be included by default on Mac OS. For Fedora, RHEL, or CentOS:
dnf install httpd-toolsAdd a cluster-admin user:
labcli --user -i -a -u=adminNote: You can ignore the warning:
Warning: User 'admin' not foundAdd a non-privileged user:
labcli --user -u=devuserNote: It will take a couple of minutes for the
authenticationservices to restart after you create these user accounts.Note: This deletes the temporary
kubeadminaccount. Youradminuser will now have cluster admin rights. -
Install The Hostpath Provisioner Operator as a storage Provisioner
labcli --hostpathThis command installs the Operator for Hostpath Provisioner, and creates a PVC for the internal image registry.
That’s it!
Have fun with OpenShift
You can log into the web console at: https://console-openshift-console.apps.okd4-sno.my.awesome.lab
You can log in as a user with: labcli --login -u=admin
Now, go install Eclipse Che: OpenShift - Your New Favorite IDE